Site Preparation Checklist for Monitoring Visits
Tasks to complete in preparation for a monitoring visit
Introduction
This guide walks site users through helpful steps to prepare for an upcoming monitoring visit. To access the content in this guide as well as more helpful tools, see the Monitoring tab.
Pro Tip: To launch linked pages without losing your place in the guide, right-click links and select to open in a new tab.
SiteVault Help
SiteVault Help is packed with detailed articles, FAQs, and even video tutorials to answer any questions that might come up along the way. Getting comfortable with our help system will be a valuable skill as you continue to use SiteVault.
- Explore the site to become familiar with navigating the different sections.
- Use the search bar to quickly find answers to specific questions.
- Use the Chat widget to reach out for additional support.
Additional Support
If you need assistance, please reach out to our Site Support team.
Create Staff Users
If not already created, ensure that your site staff have user accounts to log into SiteVault.
- Administrators
Overview
When you create a new SiteVault user for your site, you can choose from a set of system roles and, if needed, additional add-on permissions. See the About System Roles and Add-on Permissions page to learn more about what levels of access these roles and permissions provide.
For full access to the organization’s user administration, Research Organization Administrators (ROA) should also be added as Site Administrators at each site in their organization. ROA users can add users to one or more sites at a time when the research organization is selected in the vault selector. Site Administrators can only add users to their currently selected site.
For more access information, see About Roles and Permissions, or download the SiteVault Security Matrix or SiteVault User Access Guide.
Creating a Staff User
Complete the following steps to create a new Staff user or add an existing Vault Staff user to SiteVault:
- Access the Administration > Staff tab and select Create.
- Enter and re-enter the user’s email address, then select Check Email.
- If a user with that email address already exists in your research organization, enter an email address unique to your research organization.
- If one or more existing Vault user accounts are found, select the appropriate user account.
- If no Vault user accounts are found, continue creating the user.
- Complete the First Name and Last Name fields.
- Indicate if the user is an investigator.
- If applicable, complete any SiteVault Enterprise-specific fields:
- User Account Login Method: Select the appropriate login method.
- User Name: Enter a user name.
- Federated ID: Enter the user’s Federated User ID.
- Complete the Create as field:
- Select Staff with User Account if the individual is expected to access SiteVault.
- Select Staff (No SiteVault Access) if the individual is not expected to access SiteVault.
- Select Next.
- Optionally, select any additional sites, then select Next.
- For each site selected, select the user’s system role and any additional permissions (if selecting Site Staff). Use Apply to All Sites to apply the selected settings to all sites. To adjust, select a site and make changes.
- If the Create as field is populated with Staff (No SiteVault Access), then the role Site Staff (No SiteVault access) is selected for all sites.
- Select Save.
Add Study Team
If not already added to the study, add site staff to the study on the Team tab.
- Administrators
Review Roles and Permissions to understand all factors of SiteVault user access.
- Access the study from the Studies tab.
- From the Team tab, select + Add Staff.
- Select staff to assign or select a study from the Copy from Another Study field to use assignments from an existing study. Hover over staff names to reveal middle names (when available).
- Select or update the assignment role(s).
- Note: When a Study Team Assignment with the role of Principal Investigator is changed to Active, the Principal Investigator (PI) field on the study is automatically updated to that PI.
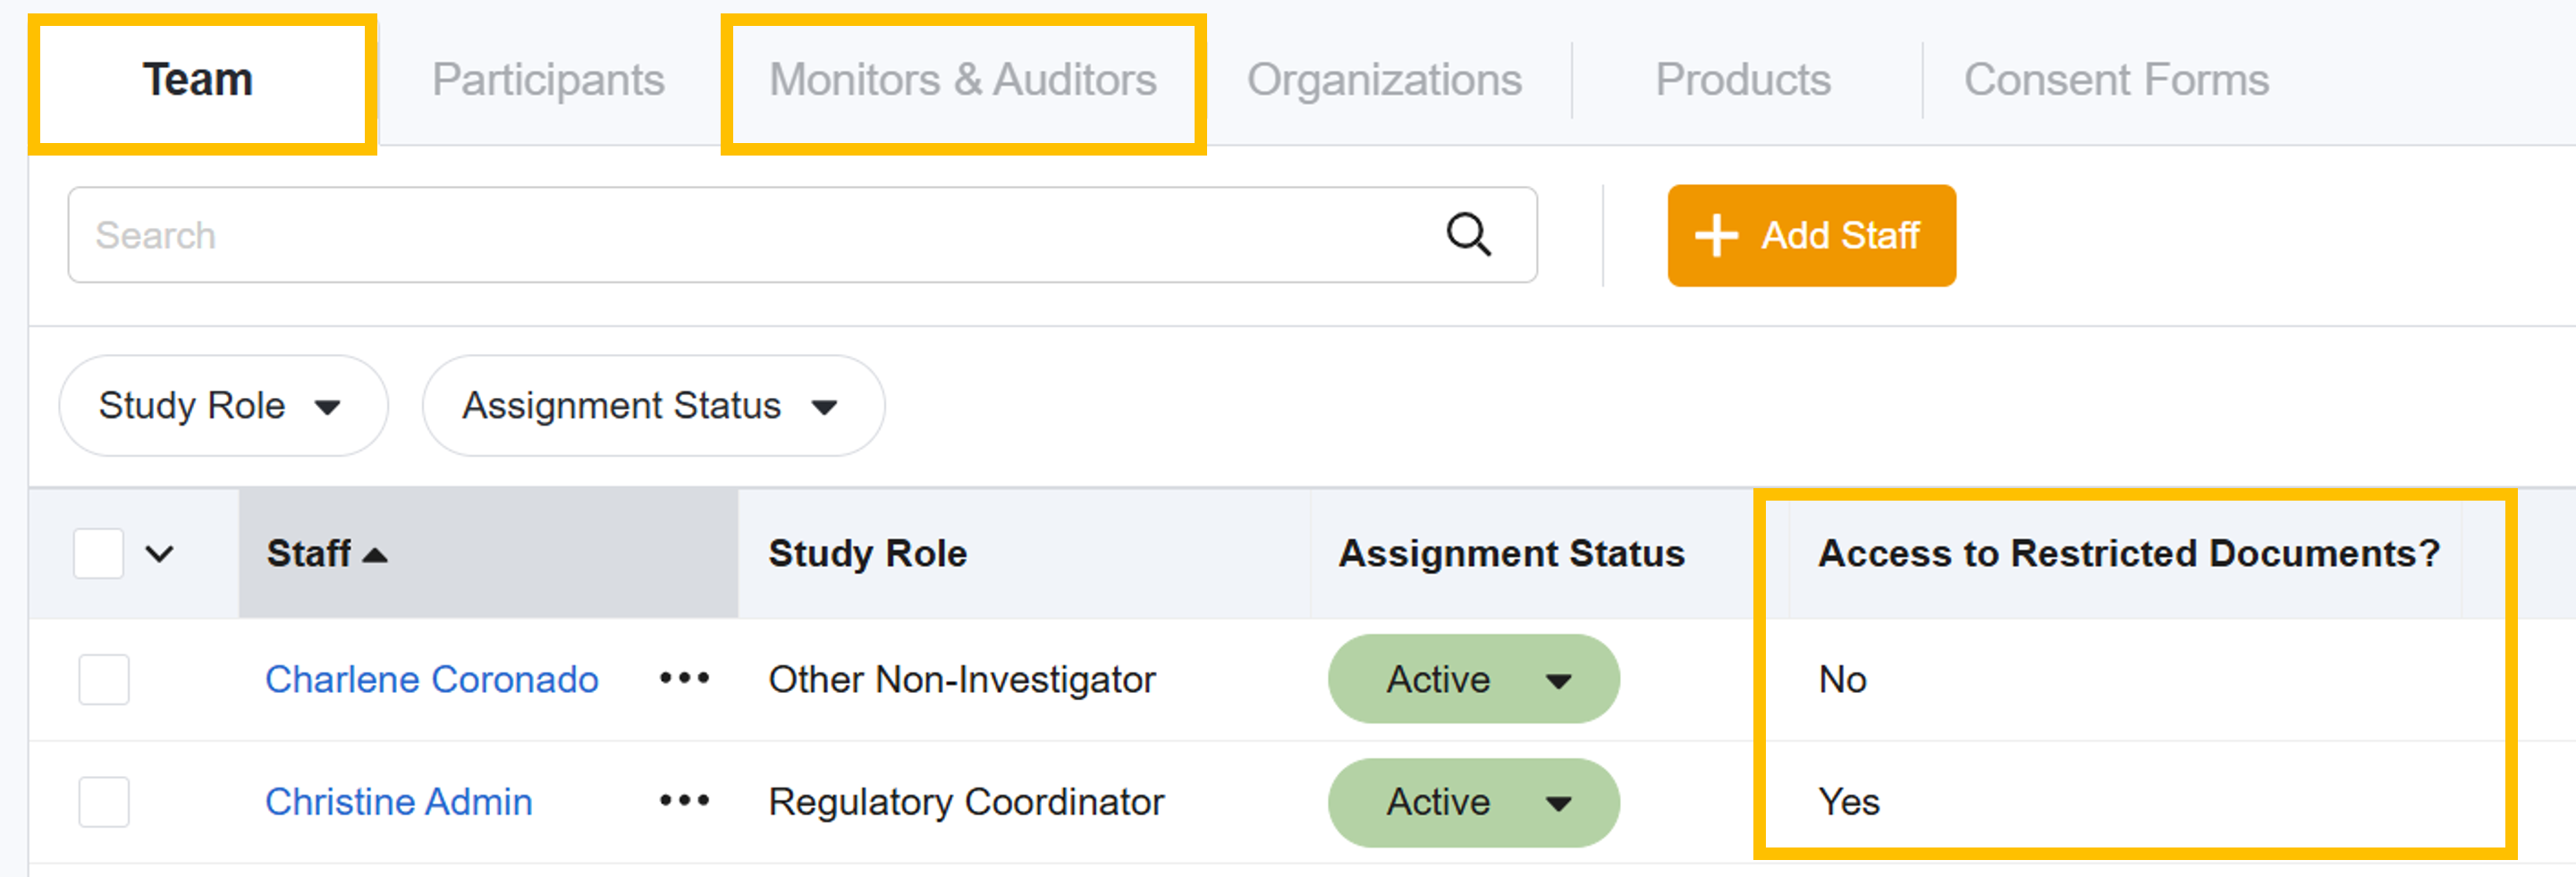
- Indicate if the user should have access to Restricted documents.
- In the Monitoring Issue Recipient field, indicate if the user should receive monitoring issues.
- Select Next.
- If available, complete the Start Date-Time field. If not completed, the field is automatically populated with the date the staff study assignment became Active in SiteVault.
- If applicable, complete the End Date-Time field. If not completed, the field is automatically populated with the date the staff study assignment became Inactive in SiteVault.
- Select Save to complete the process.
- If appropriate, change the assignment(s) to Active.
You can also create Study Team Assignments from Administrative > Staff.
Confirm that all study staff assignments are in the Active state.
Create Monitor Users and Add Them to the Study
To create a Monitor or External User account, they must be assigned to at least one study during the creation process. Follow the steps below.
If the monitor or auditor for this study is already an active user with access to another study, you can simply add them to the study on the study’s Monitor and Auditor tab using the + Monitor/Auditor button.
- Administrators
Guidelines/Requirements
- Research Organization Administrator users can add users to one or more sites at a time when the research organization is selected in the vault selector.
- Site Administrators can only add users to their currently selected site.
- At the time of user creation or addition, a Monitor or External User must be assigned to at least one study.
- A notification is issued to the Monitor upon receiving access to a study.
- Scheduled Access Start Date must be a future date. If not completed, the Scheduled Start Date defaults to today and the user immediately has access to the study documents in SiteVault.
- Monitor access date/time is based on the site’s time zone.
For more access information, see About Roles and Permissions, or download the SiteVault Security Matrix or SiteVault User Access Guide.
Create a Monitor or External User
Complete the following steps to create a new Monitor or External User or add an existing Vault Monitor or External user to SiteVault:
- Access Administration > Monitors & External Users and select + Create.
- Enter the email address of the user to add, re-enter the email address, then select Check Email.
- OR enter a cross-domain user name in the email field; SiteVault will search for the user name and retrieve the matching email address.
- If a user with that email address already exists in your research organization, enter an email address unique to your research organization.
- If one or more existing Vault user accounts are found, select the appropriate user account. Contact your Research Organization’s administrator or the individual if unsure.
- If no Vault user accounts are found, then continue creating the user.
- Complete the First Name and Last Name fields.
- If applicable, complete any SiteVault Enterprise-specific fields:
- User Account Login Method: Select the appropriate login method.
- User Name: Enter a user name.
- Federated ID: Enter the user’s Federated User ID.
- Select Next.
- Select the + Add Study.
- Select one or more studies.
- Select Save.
- Optionally, complete the Scheduled Access Start and End Date fields.
- Indicate if the user should have access to Restricted documents.
- Select Save.
For more information on monitor access, see Monitors and External Users Access and Limitations.
Upload and Finalize Source Documents
Important! If you have access to multiple vaults, ensure that you are logged in to Veeva SiteVault before uploading source documents. The SiteVault logo is displayed in the upper-left corner. Moreover, ensure that the correct site is selected in the vault selector.
Upload Source Documents to the Study eBinder
To upload Source Documents to the Study eBinder, complete the steps below:
- Navigate to Documents > Study eBinder.
- Expand the Upload dropdown menu to select Bulk Upload Source Docs.
- Select one of the following upload methods:
- Browse your local folders.
- Select the documents to upload.
- Select Open.
- Drag and Drop
- With the Bulk Source Upload window open, select the documents to upload.
- Use your cursor to drag the documents from the local folder into the Bulk Source Upload dialog.
- Browse your local folders.
- Complete the required and any additional optional fields as needed. Note: You can apply the same content to all fields in a column by populating the header row field. Individual fields can be adjusted at the row level, as needed.
- Select Save to complete the process.
If you need to edit a field on a document after saving, open the document and select Edit Fields (![]() ) in the Document Information panel. Once finalized, only Site Administrator users can edit the fields on source documents.
) in the Document Information panel. Once finalized, only Site Administrator users can edit the fields on source documents.
When you’re finished creating source documents, ensure that you finalize all documents to make them ready for monitor review.
Note If you attempt to create a new Adverse Event Log, IP Accountability Log, or Protocol Deviations Log document for a study participant and an existing document already exists for that study participant, SiteVault displays an error message. Instead of creating a new document, we recommend that you upload the document as a new version instead.
Source Upload Tips
See the following tips and tricks for using the Upload Source Documents wizard in the Study eBinder:
- Documents with a hyperlinked filename (formatted as an image or PDF) will generate a preview when clicked.
- Use the header cell of a column to enter the same information for every file.
- The Upload As column allows you to upload files directly to the steady state.
- If needed, you can create a new participant for a file during the upload process. Select the Participant field on the row of the file and select +Create.
- The start and end dates should reflect when the data was captured. Values can be defaulted based on each file’s naming convention. If a date was included in the document’s filename, the date is automatically added to the End Date field of the uploaded document.
- Copy Certification Verdict: A document is considered a copy of source if it has been downloaded from an electronic source or electronic health record (EHR) system or if it has been scanned before being uploaded to SiteVault. A document is considered an original source document if this is the file where the data was originally captured (for example, if a .DOCX file was completed during the visit). SiteVault’s Copy Certification process should be completed on documents considered a copy of a source.
- Hover over a row and select the remove icon (
 ) to remove the file without uploading.
Upload and Finalize Study Documents
The Study eBinder upload process includes the option to move documents to their steady state, perform copy certification, and/or initiate a workflow (eSignature, Read and Understand, or Review). Documents uploaded to the eBinder are also present in the Library.
Complete the following steps to upload documents directly to the Study eBinder:
Note The fields that are displayed in the Details section mostly depend on the Document Type selected in Step 2.
- Access Documents > Study eBinder.
- Select one of the upload methods below:
- Upload (select the Upload button)
- Select the locally saved documents.
- Select Open.
- Drag and Drop
- With the Study eBinder browser window open, select the locally saved documents on your computer.
- Use your cursor to drag and drop documents from a local folder to an eBinder folder or the eBinder table.
- Upload (select the Upload button)
- For each document:
- Select the Document Type. To classify a document later, select Classify later (Move to Document Inbox) and move to the next document.
- You will be alerted if an existing study document is found to be a file or document type match.
- Select the upload state:
- Draft: The document requires additional processing/review (updates, signatures, etc.).
- Final State: (state label depends on Document Type chosen in the previous step): Document is complete with no further processing needed.
- Additional Actions:
- To perform Copy Certification, select Additional Actions > Perform Copy Certification.
- If the document is a Source document, verify if the document is an exact or redacted copy.
- To initiate a workflow, select the appropriate workflow from Additional Actions.
- Complete the required fields in the Start Workflow dialogue.
- Note: Workflows are not available on Restricted documents.
- To perform Copy Certification, select Additional Actions > Perform Copy Certification.
- Complete the Description field with details not captured in other document fields.
- Complete the Document Date field with the most meaningful date to uniquely identify this document version (for example, Version date, approval date, log end date, meeting date, etc.).
- If available, complete the optional Start Date field. This date should reflect the earliest date of recording or capturing in this document. The latest date of data recording in this document should be added in the Document Date or End Date fields.
- If available, the Expiration Date field with the date on which the document is due to expire.
- If the document should have limited visibility to avoid revealing private information or the study is masked or blinded, select Yes in the Restricted field.
- Populate the remaining fields.
- Select Save.
Review and Update Site Documents and the Monitor’s Access
A Monitor or an External User may request access to your site’s business process documents, such as standard operating procedures (SOPs), work instructions, or policy memos. These are stored in the Site Documents eBinder, which is not visible to non-site staff users. However, you can share these documents with Monitors/External Users on an individual document basis, accessible to them through a report. When you choose to share a document, the document is visible to all Monitors and External Users at your site.
Documents in active workflows (including Read and Understand) will not display the option to change visibility until all active workflows have been completed or canceled.
Monitors can find instructions for viewing these documents on Find Documents Ready for Review.
Note To complete the grant and revoke actions, Site Admins must have the site selected in the Vault Selector. Research Organization Admins can perform these actions under the Research and Site levels.
Grant Access to Site Documents
- Administrators and Site Support
- Locate the document you want to share.
- Select the document’s Actions (…) menu.
- Select Grant Monitor/External User Visibility.
- Select Continue. The Shared with Monitor/External Users? document field is set to Yes and the document is now visible to Monitor/External users.
Revoke Access to Site Documents
- Administrators and Site Support
- Locate the document you no longer want to share.
- Select the document’s Actions (…) menu.
- Select Revoke Monitor/External User Visibility.
- Select Continue. The Shared with Monitor/External Users? document field is set to No and the document is no longer visible to Monitor/External users.
Determine if a Site Document is Shared
- Open the document.
- Review the Shared with Monitor/External Users? document field.
Find all Shared Site Documents
- Access the Site eBinder
- Select SOPs & Policies
- Review the Shared with Monitor/External Users? column. If not visible, use the Actions menu (…) to edit columns.
Review and Update Restricted Documents and the Monitor’s Access
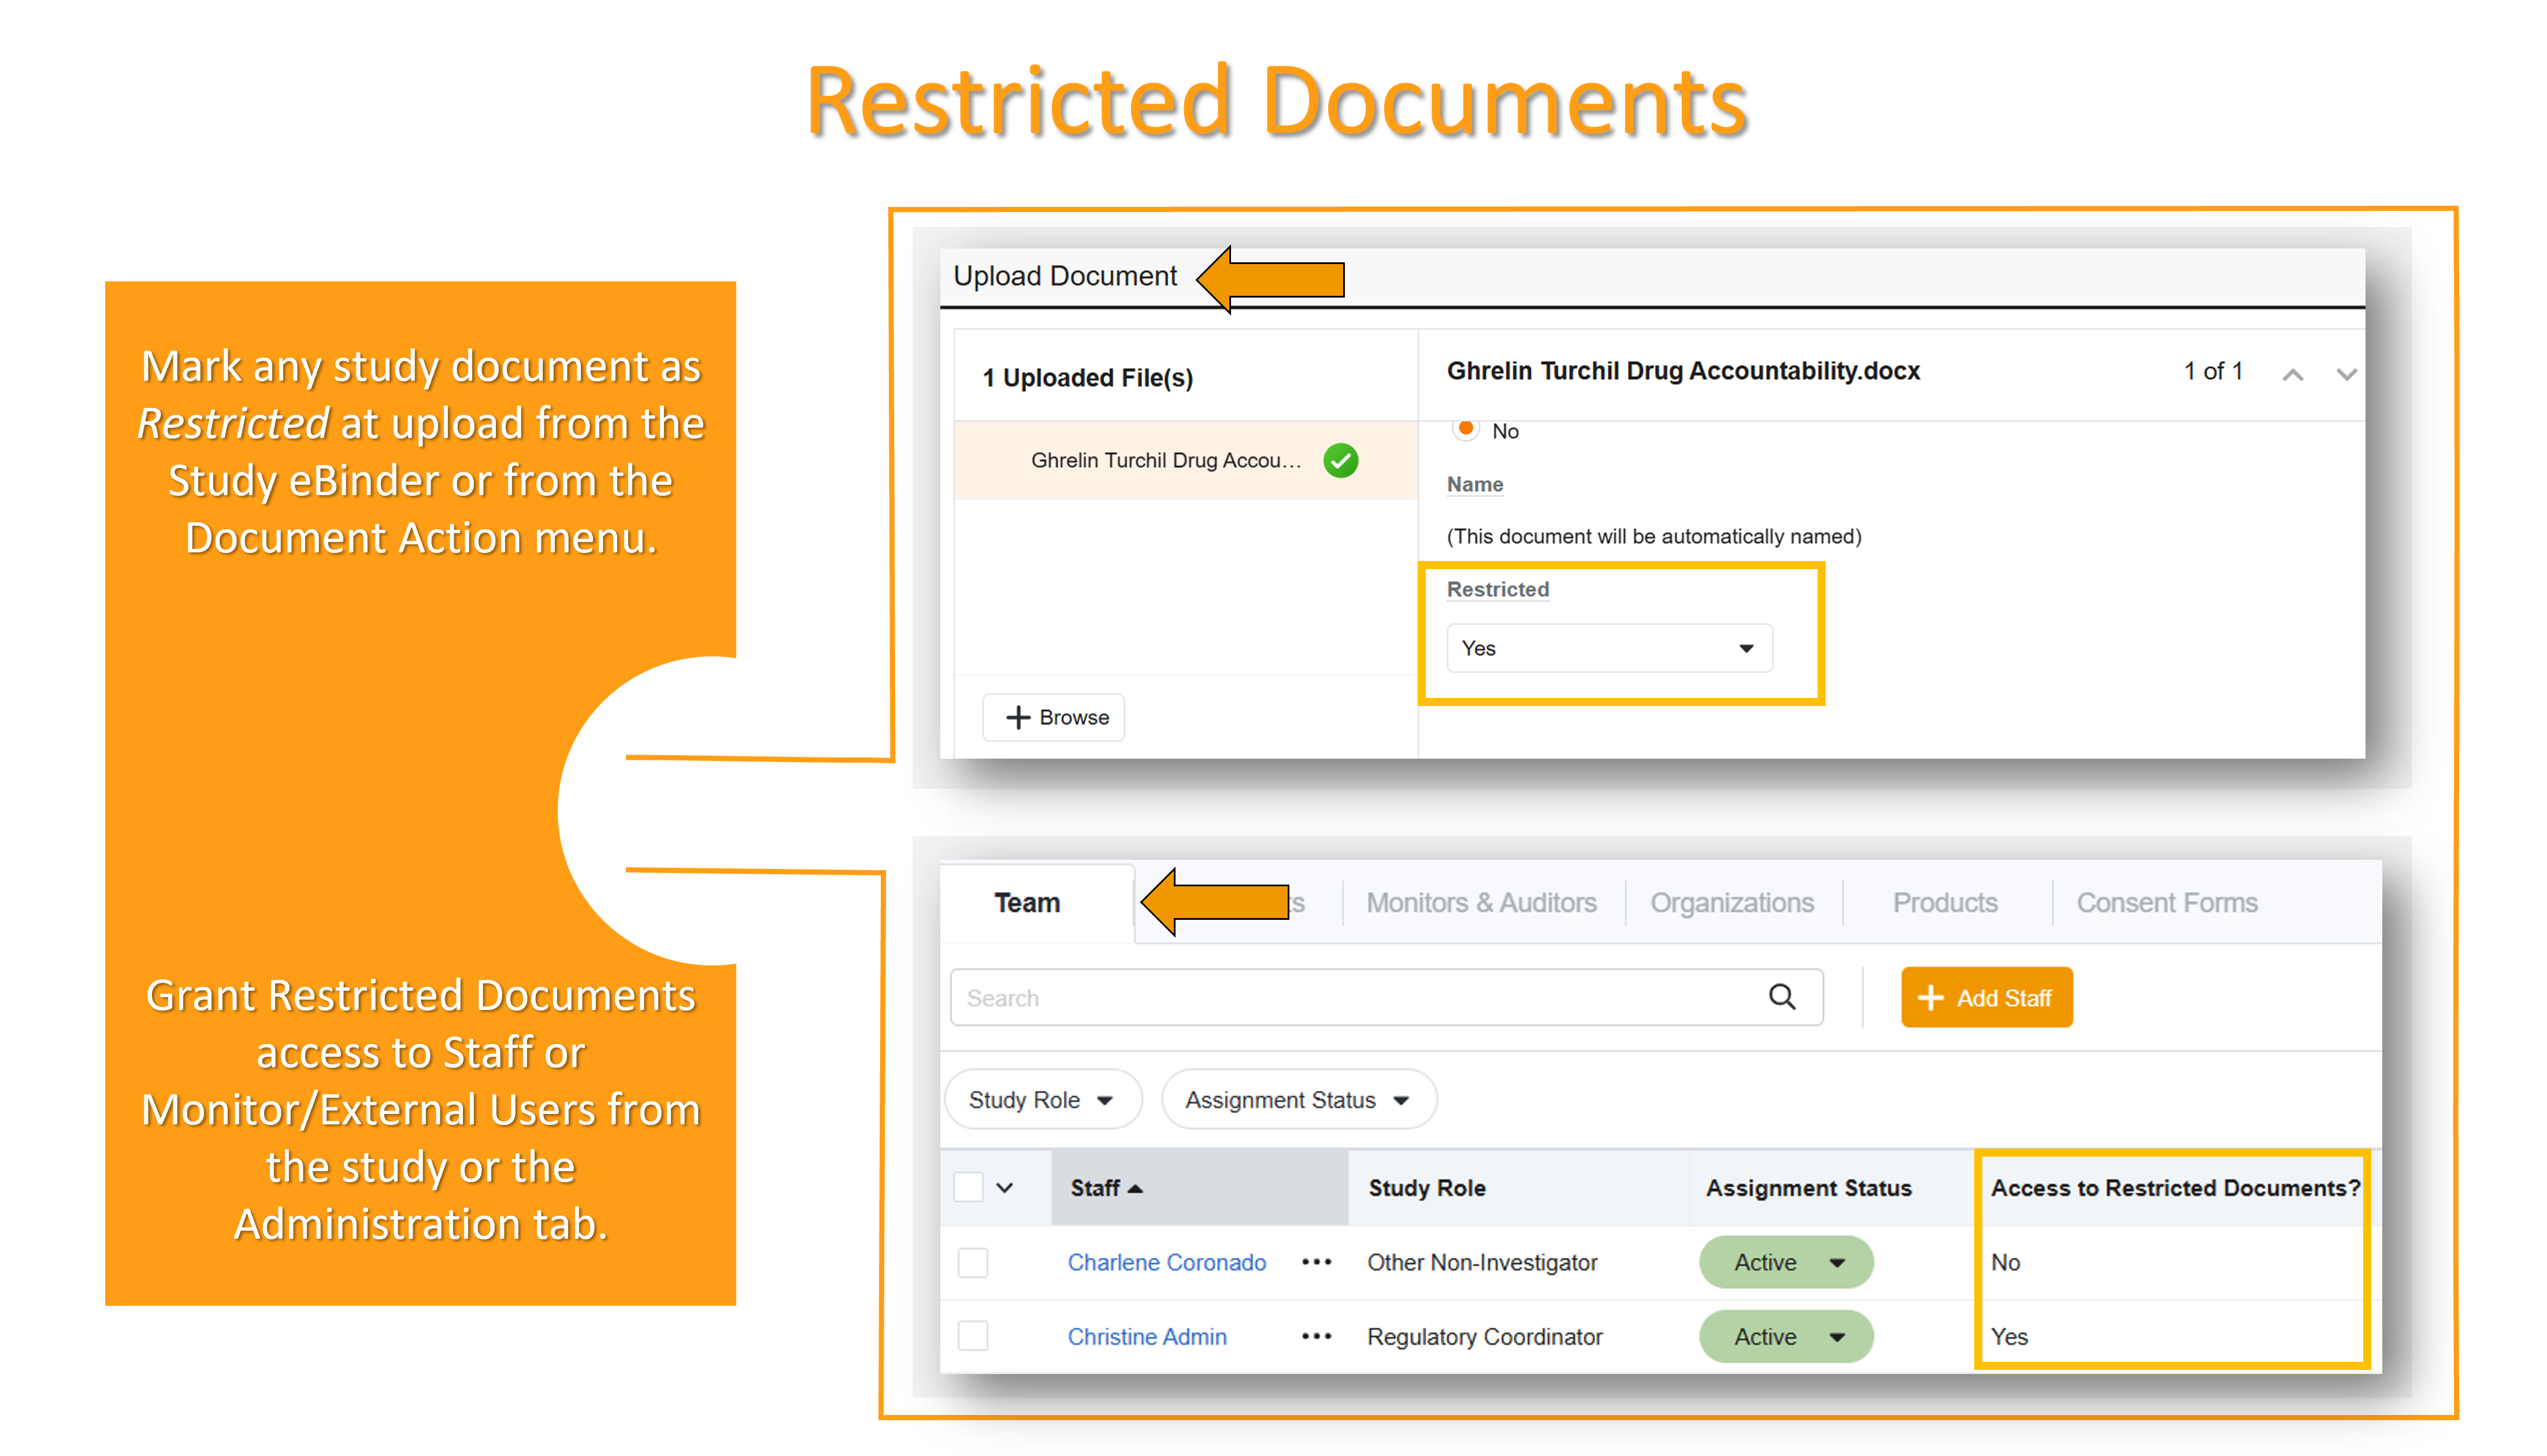
The Restricted document functionality allows sites to limit document visibility to specific users assigned to the study. The feature is intended to be used for blinded/masked studies where certain documents (ex. randomization information) must remain hidden from the larger study staff. Restricting documents and staff is a two-step process that includes first marking individual study documents as Restricted and then granting individual study staff members access to Restricted documents. Only study staff members with access to Restricted documents can view study documents marked as Restricted.
Summary
- Restricted documents are visible only to Staff or Monitors/External Users granted access to Restricted documents at the study level. Administrators must also receive study-level access to Restricted documents to view Restricted documents.
- Administrators can grant or revoke a study staff member (including themselves) or monitor/external user’s access to Restricted documents. Granting/revoking restricted access must be performed per user, per study.
- Admins and Study staff with access to Restricted documents for a study can:
- View, edit, and approve/finalize restricted documents for the study
- Upload documents as restricted via the Study eBinder
- Toggle a document’s restrictedness from the Document Actions menu
- All study-specific documents can be restricted; non study-specific/multi-study documents such as CVs, licenses, etc., cannot be restricted.
- Restricted documents cannot be sent on workflows.
- Before study archival can be completed, all Restricted study documents must be unrestricted (changed to Not Restricted). The Study Archive action includes a check for Restricted documents.
- Restricted documents can be exchanged through Site Connect, however, it is important to note that for full Restricted visibility and functionality in both environments a connected user should have access to Restricted documents in both Site Connect and SiteVault. For more information on Site Connect activity and permissions, see SiteVault and Site Connect.
Mark a Document as Restricted or Not Restricted
Staff users granted access to Restricted documents can mark documents as Restricted by:
- Setting the Restricted field to Yes when uploading a document to the Study eBinder
- Selecting Change to Restricted from Document Actions menu
From Study eBinder Upload
To upload a document to the Study eBinder as Restricted, select Yes from the Restricted field during the upload process.
From Document/All Actions
To toggle a document’s restrictedness, access the document and select either Change to Restricted or Change to Not Restricted from the Actions menu (…).
Grant or Revoke Access to Restricted Documents
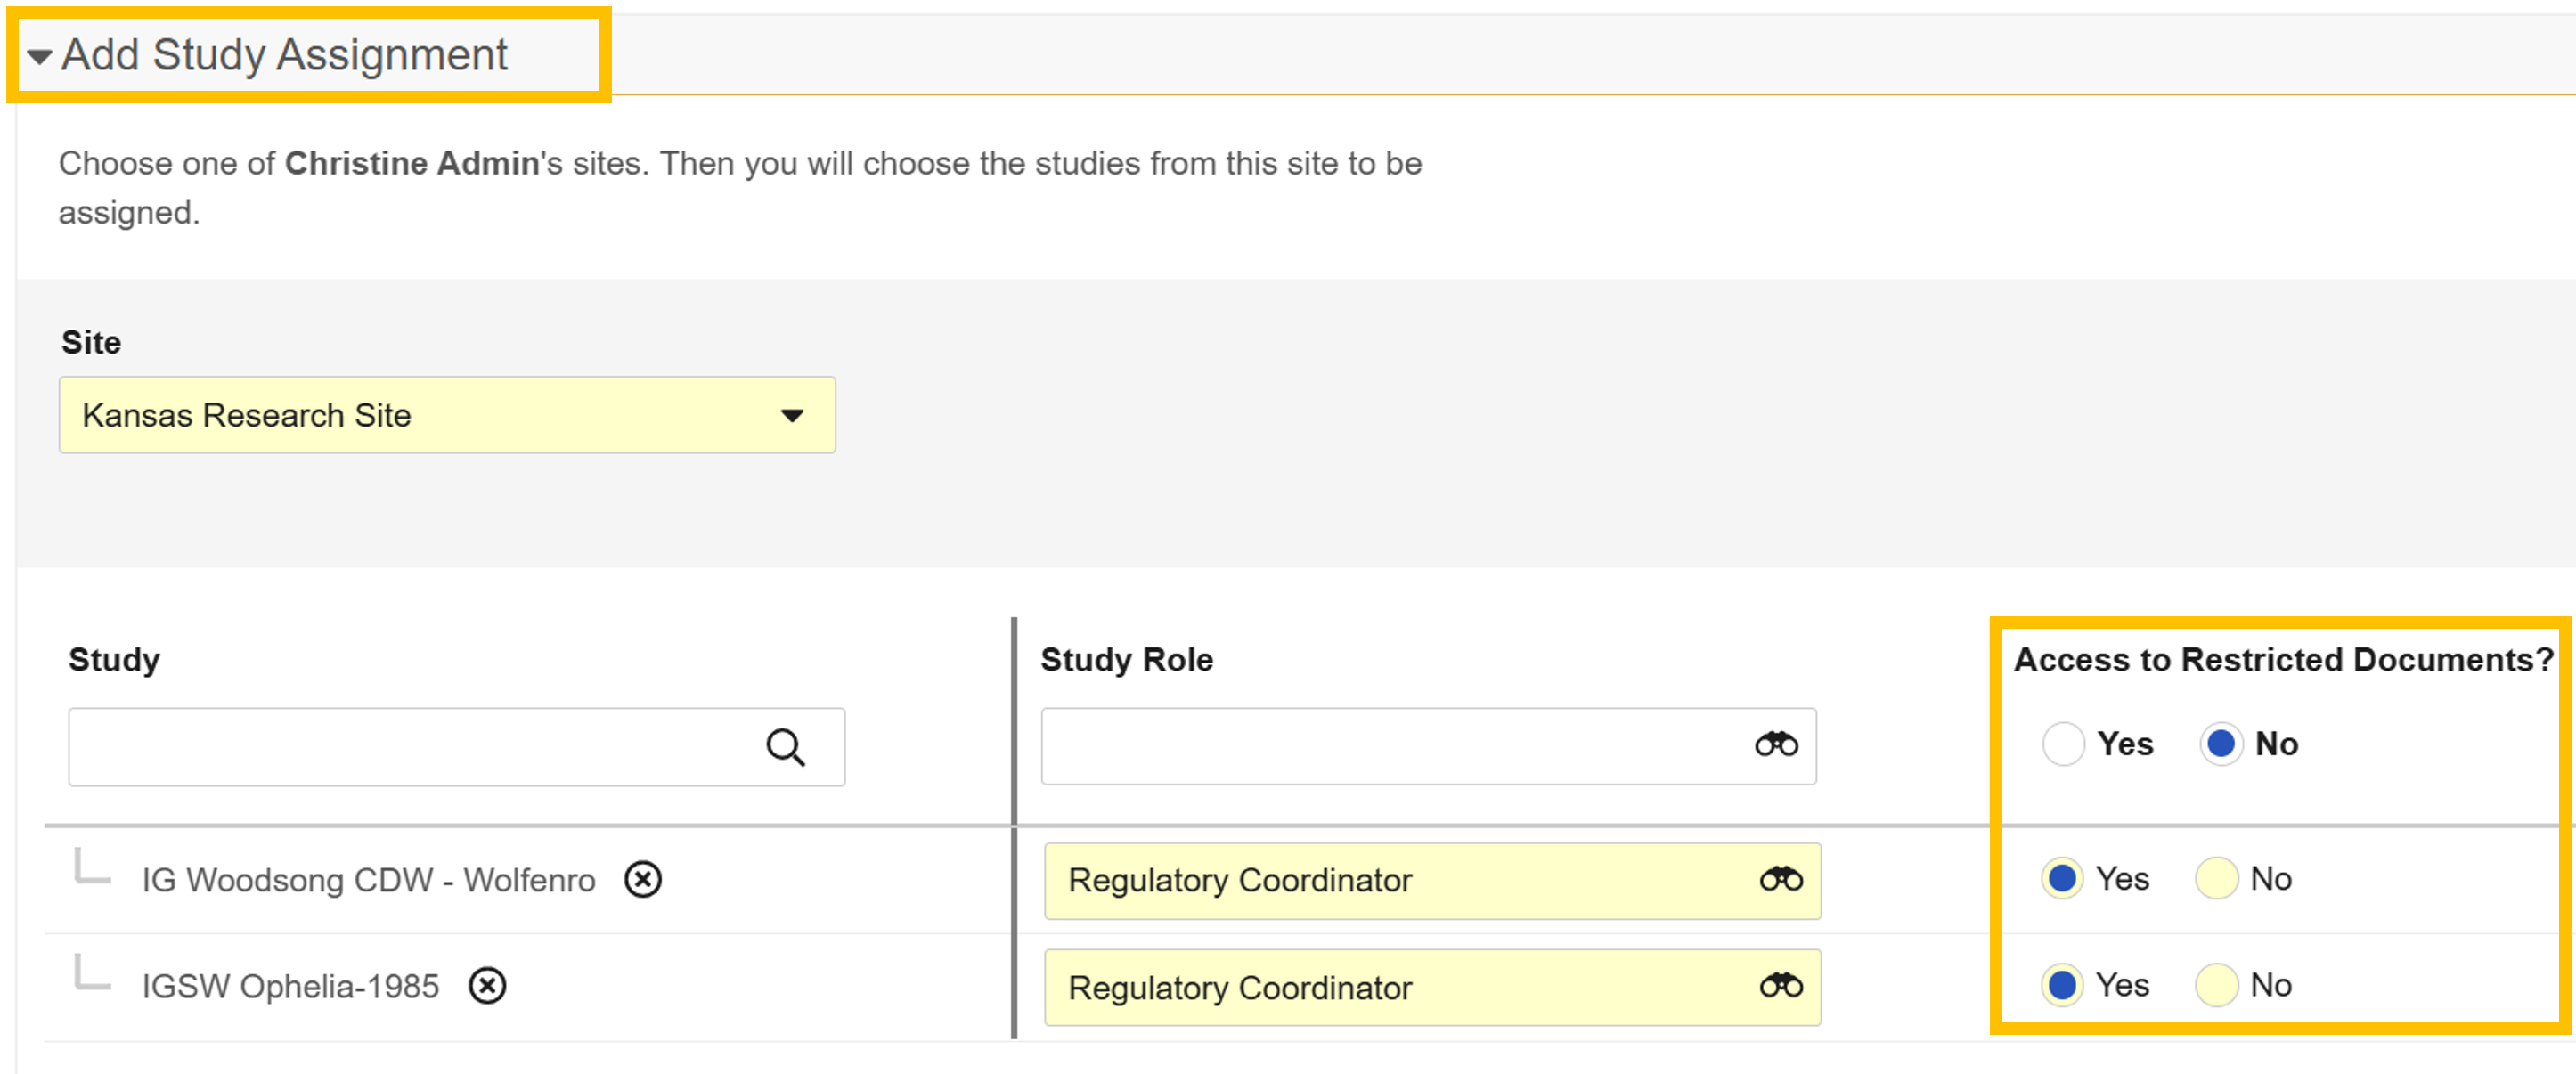
Administrators can grant or revoke user access to Restricted documents (including their own) when adding or editing Staff or Monitor and External User study assignments from the Study or Administration tabs.
From the Study
Administrators can grant or revoke study-level access to Restricted documents from Study tabs for:
- Staff when adding or editing a Team Assignment from Study > Team
- Monitors and External Users when adding or editing a Study Assignment from Study > Monitor & Auditors
From Administration
Administrators can grant or revoke study-level access to Restricted documents from the Administration tab for:
- Staff when creating a user or adding a Study Assignment from Administration > Staff
- Monitors and External Users when creating a user or adding Site Access and a Study Assignment from Administration > Monitors & External Users
Restricted Permissions in Site Connect and SiteVault
Site Connect and SiteVault permissions are managed by different systems and administrators; a user’s access to restricted documents in one system does not guarantee the same access is assigned in the other. See the table below for the expected behavior based on different permission combinations.
| Restricted Permissions | Site Connect Behavior | SiteVault Behavior |
|---|---|---|
| No Restricted Access |
|
|
| Restricted Access in Both |
|
|
Restricted Access in Site Connect No Restricted Access in SiteVault |
|
|
No Restricted Access in Site Connect Restricted Access in SiteVault |
|
|
Review for Open Monitoring Issue Tasks
While reviewing documents in SiteVault, a monitor/CRA may log an issue, indicating that they require more information about a document, or that a document is missing. Site users have access to a reporting dashboard that provides instant access to data regarding open issues (Waiting on Site Response) as well as other monitoring-related counts and data.
Open Monitoring Issues (Waiting on Site Response)
- Navigate to Reporting > Dashboards.
- Select Monitor Review Dashboard for Sites.
- Select and apply filters (required upon first access, edit as needed).
- Select the data in the Waiting on Site Response tile.
Monitor Resources
Ensure the monitor is familiar with SiteVault Help and specifically, the following pages: