Monitoring in SiteVault
CRA steps for monitoring in SiteVault
Introduction
This guide walks you through the monitoring process in SiteVault. To access the content in this guide as well as more helpful tools, see the Monitor/CRA sections of the Monitoring tab.
Pro Tip: To launch linked pages without losing your place in the guide, right-click links and select to open in a new tab.
SiteVault Help
SiteVault Help is packed with detailed articles, FAQs, and even video tutorials to answer any questions that might come up along the way. Getting comfortable with our help system will be a valuable skill as you continue to use SiteVault.
- Explore the site to become familiar with navigating the different sections.
- Use the search bar to quickly find answers to specific questions.
- Use the Chat widget to reach out for additional support.
Additional Support
If you need assistance, please reach out to our Site Support team.
Welcome to SiteVault Monitoring!
Welcome to SiteVault Monitoring! Our goal is to provide you and your site with aligned tools and language to help you breeze through the monitoring process, keeping your study timeline on track, or even ahead of schedule.
Watch the following demo to familiarize yourself with the navigation and tools available in SiteVault. The rest of this guide provides additional support and step-by-step instructions for each process.
Don’t hesitate to reach out to our site staff if you have any questions.
Access to SiteVault
An Administrator for the site will add you to their SiteVault as a Monitor/External User, with access to a specific study or studies. You will receive an email with details on how to access your SiteVault account. This account will provide you with access to the study documents and system tools you require to complete your document reviews.
If you do not want to reuse an existing Vault account, we recommend you self-register for VeevaID before requesting access to a site/study.
Once added to a study, an external user can complete the monitoring of study documents in the approved or steady state.
Access Does Not Provide
- Visibility to any documents in the Draft state.
- Ability to edit, upload, or delete documents.
- Ability to download participant source documents.
- Ability to view financial documents such as contracts or budgets.
Access Provides
- Inidividual user login/password with access date/time based on the site’s time zone.
- Ability to view, annotate, or download documents (to which they have access) in the approved (steady) state (major version documents such as 1.0 or 2.0).
- Ability to create monitoring issues and request missing documents.
- Reports monitor/CRA can access:
- Documents Ready for Monitoring Review (included in the Monitor Review Dashboard)
- Documents Waiting on Site Response (included in the Monitor Review Dashboard)
- Monitoring Issues (multiple)
- New documents since the previous monitoring visit
- Read and Understand History
- Monitor Review Dashboard
- Restricted documents (masked/blinded studies) and site business documents require additional access; see the sections below for more information.
Restricted Documents
Restricted documents have limited visibility to avoid revealing private information or due to the study being masked or blinded. To view Restricted documents a user must have Restricted access granted at the study level. An Administrator can grant Restricted access to Monitors and External Users.
Site Documents
A Monitor or an External User can request access to the site’s business process documents, such as standard operating procedures (SOPs), work instructions, or policy memos. These are stored in the Site Documents eBinder, which is not visible to non-site staff users. However, sites can share these documents with Monitors/External Users on an individual document basis, accessible to them through a report.
Find Documents Ready for Review
There are several ways to access documents, but the most efficient way for your review process is through the Study eBinder, where we have created a view that allows you to easily access all finalized and ready-for-review documents.
Note If you have access to multiple sites or vaults, ensure that the appropriate site is selected in the vault selector.
Choose from the following options to locate documents ready for monitor review:
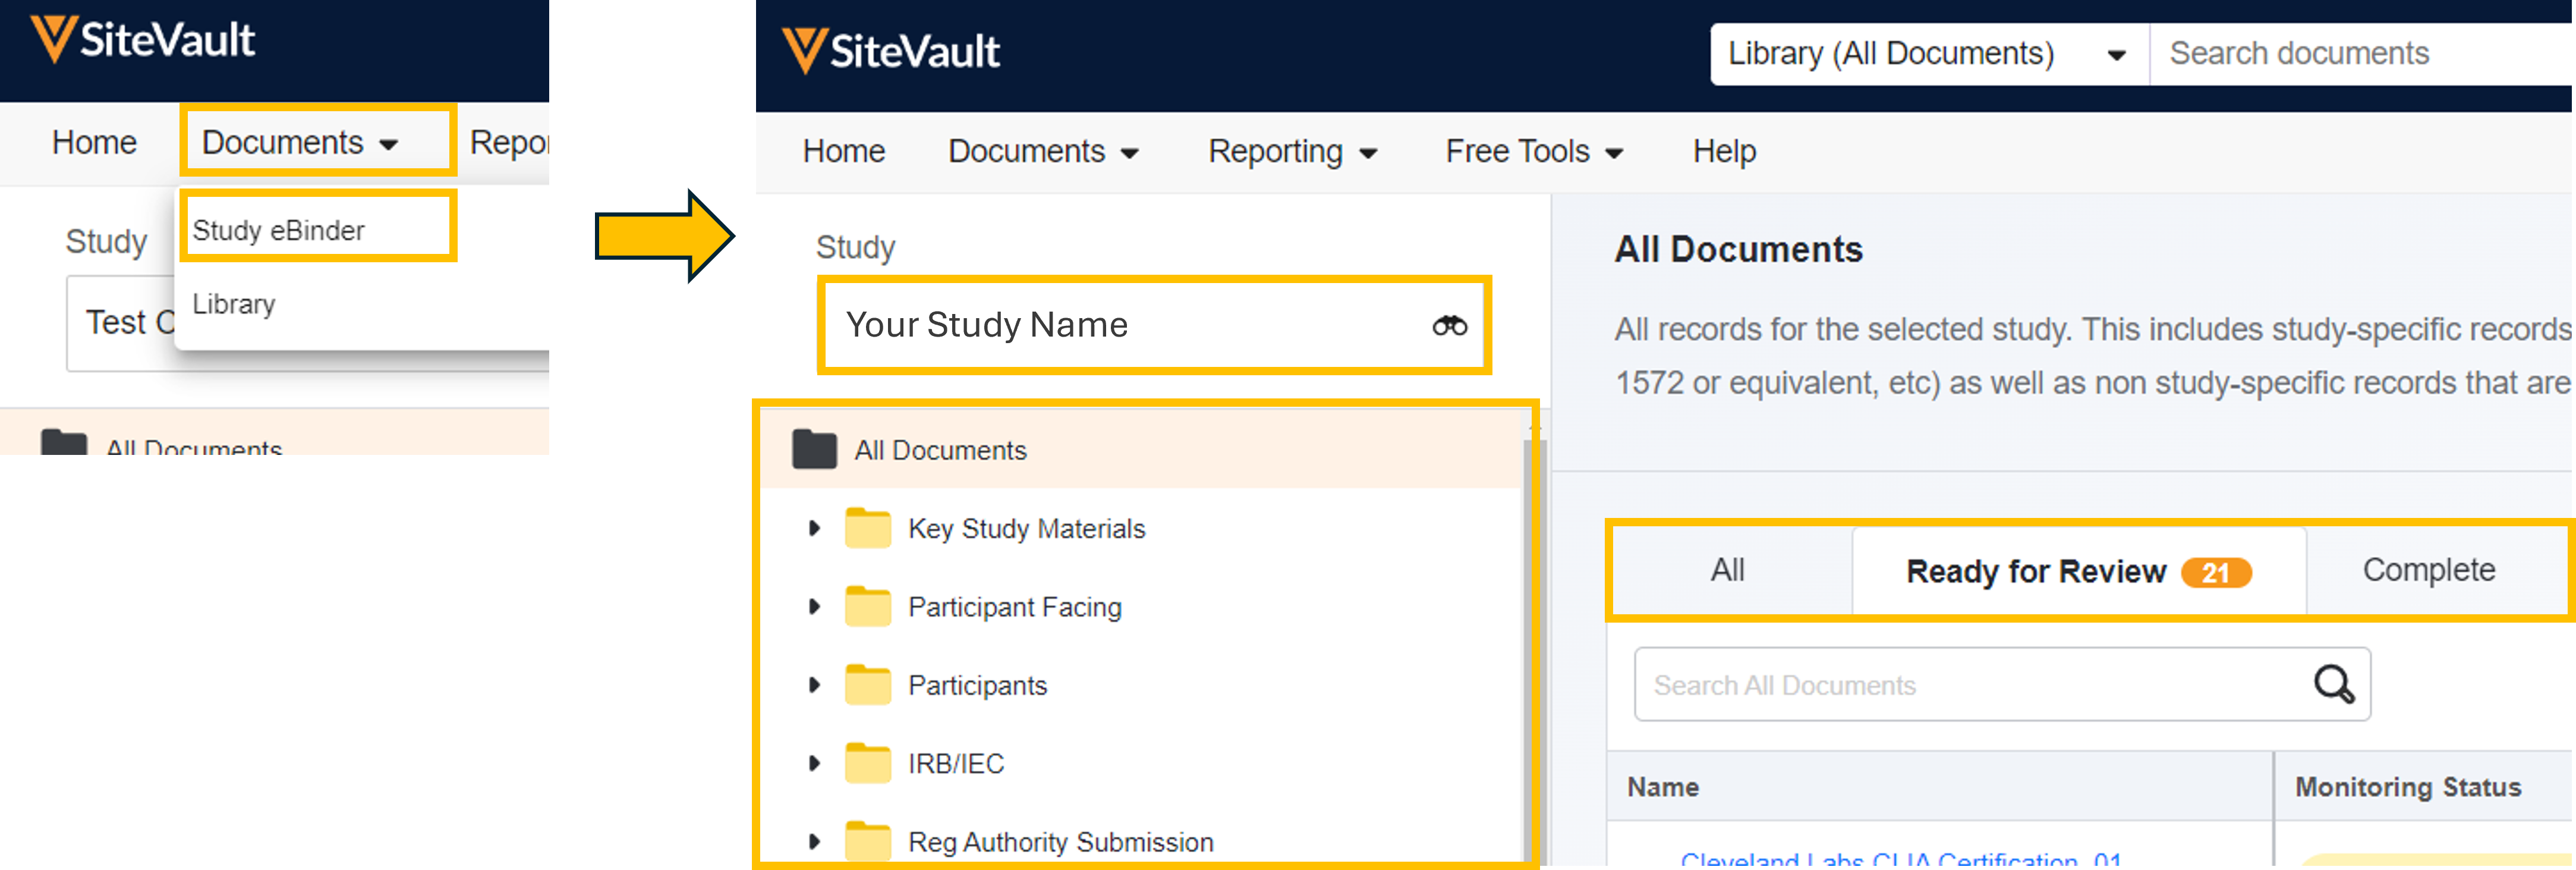
Study eBinder
Navigate to Documents > Study eBinder and select the study in the Study Selector. Select the All Documents folder or select a subfolder to view a subset of documents. To filter the view by monitoring status, choose from one of the following tab views:
- All: All finalized documents in the selected folder, regardless of monitoring status.
- Ready for Review: All documents start in the Ready for Review status. Any document with a new version stacked will also start in Ready for Review, thus all versions of a document in the Ready for Review state will each have their own row in the list. Selecting a document will open the document for review in the Monitoring eBinder Document Viewer.
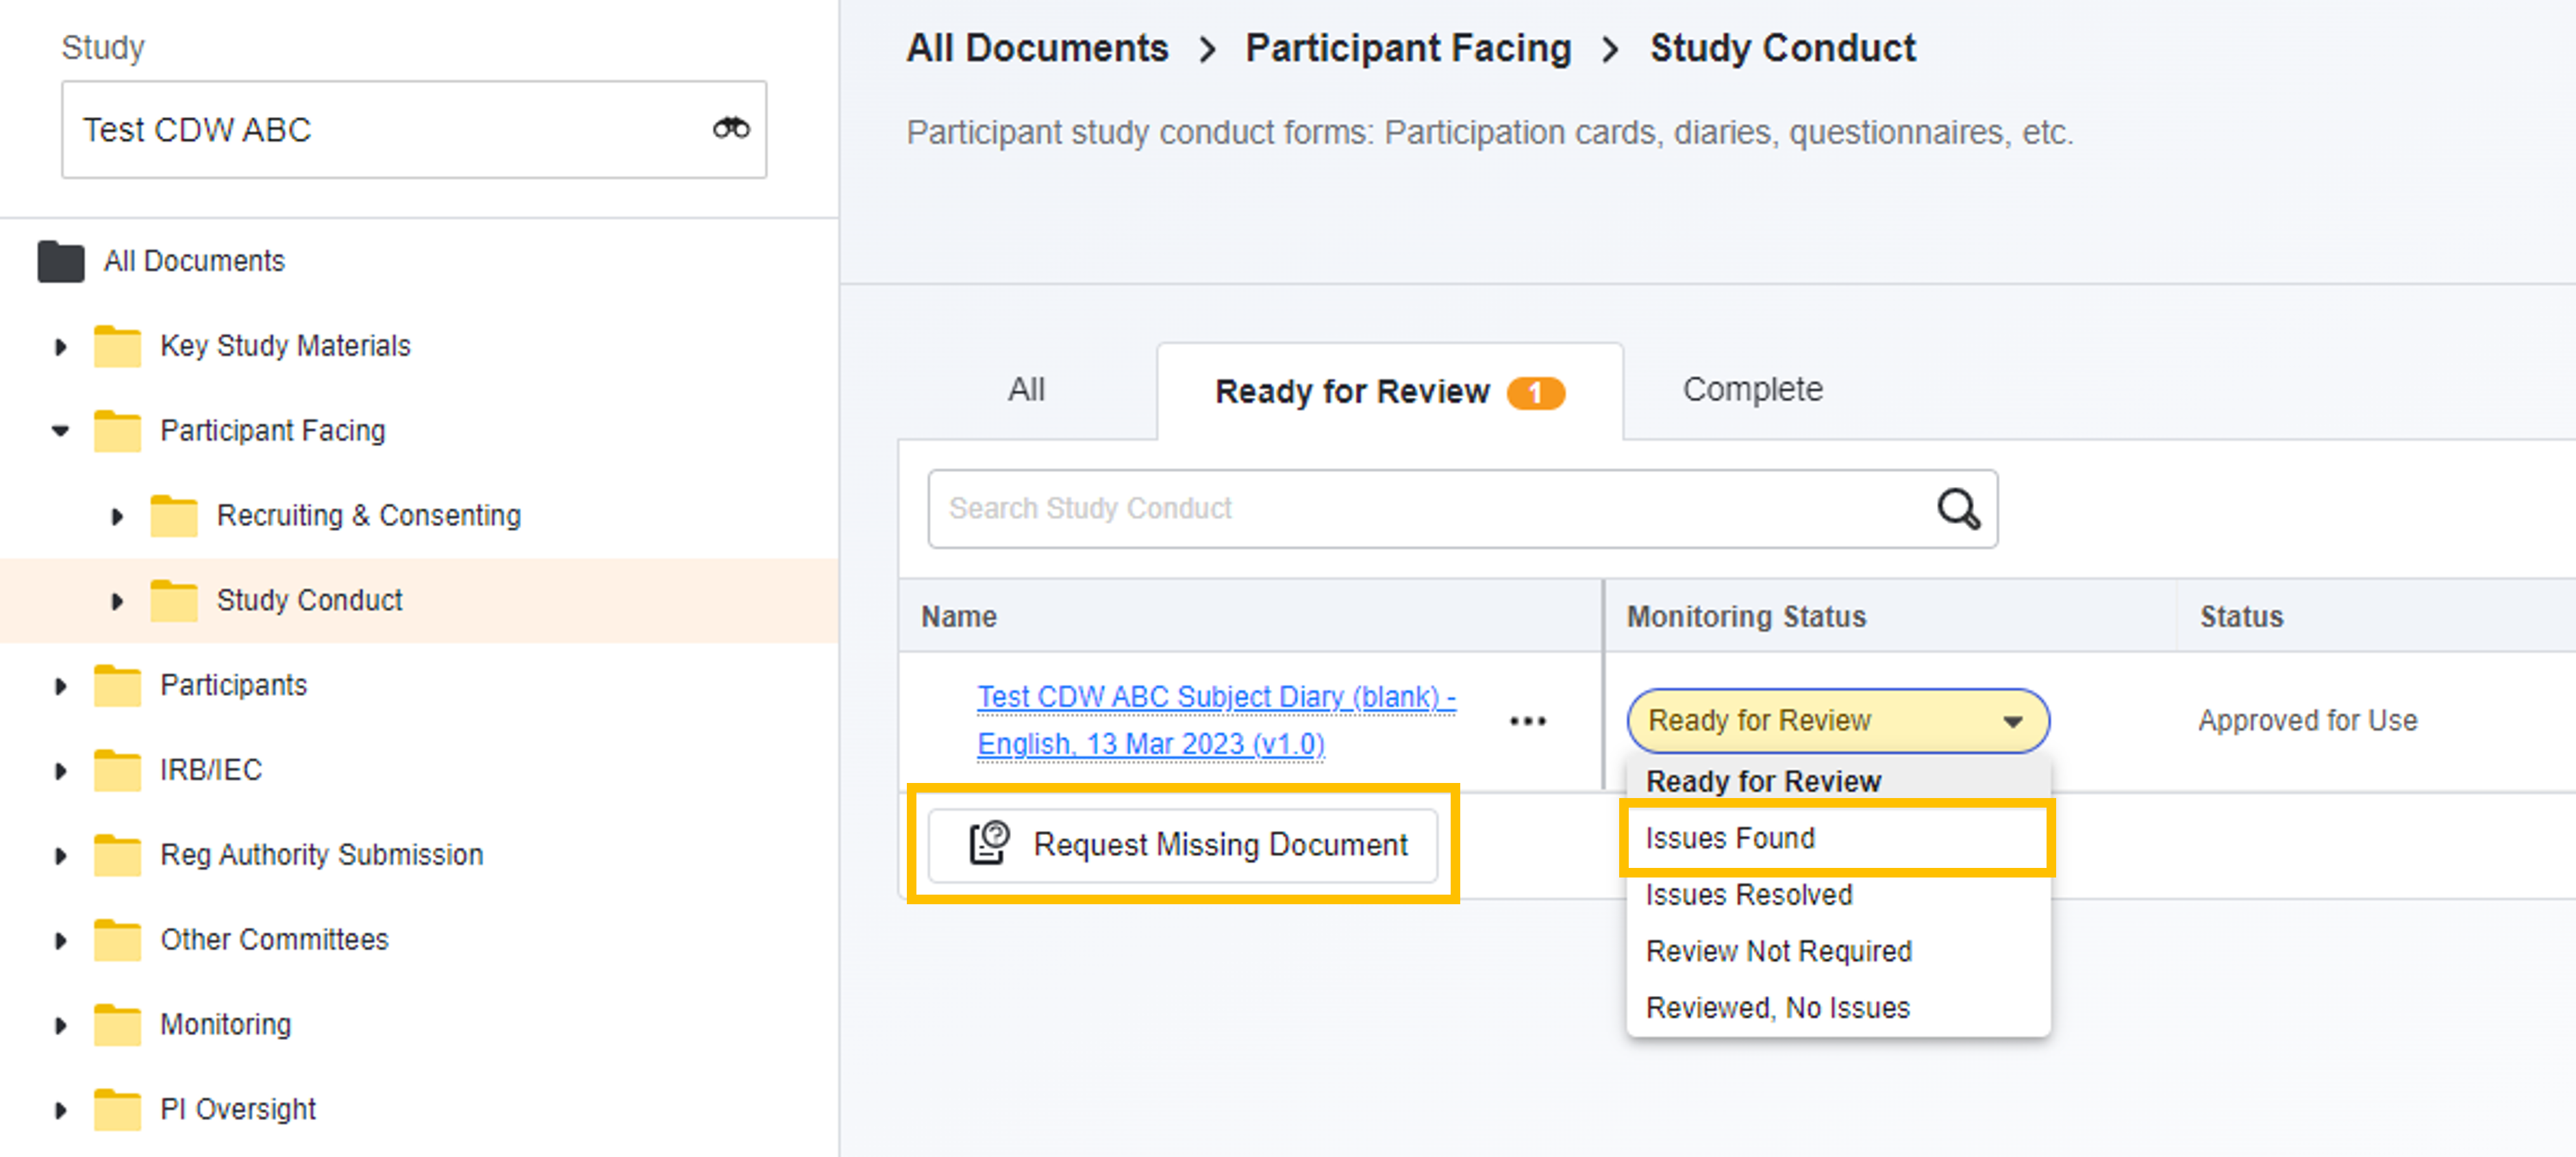
- Selecting the Issues Found status will prompt you to send an issue to the site.
- When a site user addresses an issue, the status updates to Issue Resolved.
- Complete: Documents in the selected folder that have been reviewed or do not require a review by a Monitor/External user. The following statuses are considered Completed statuses but can be updated at any time:
- Reviewed No Issues
- Review Not required
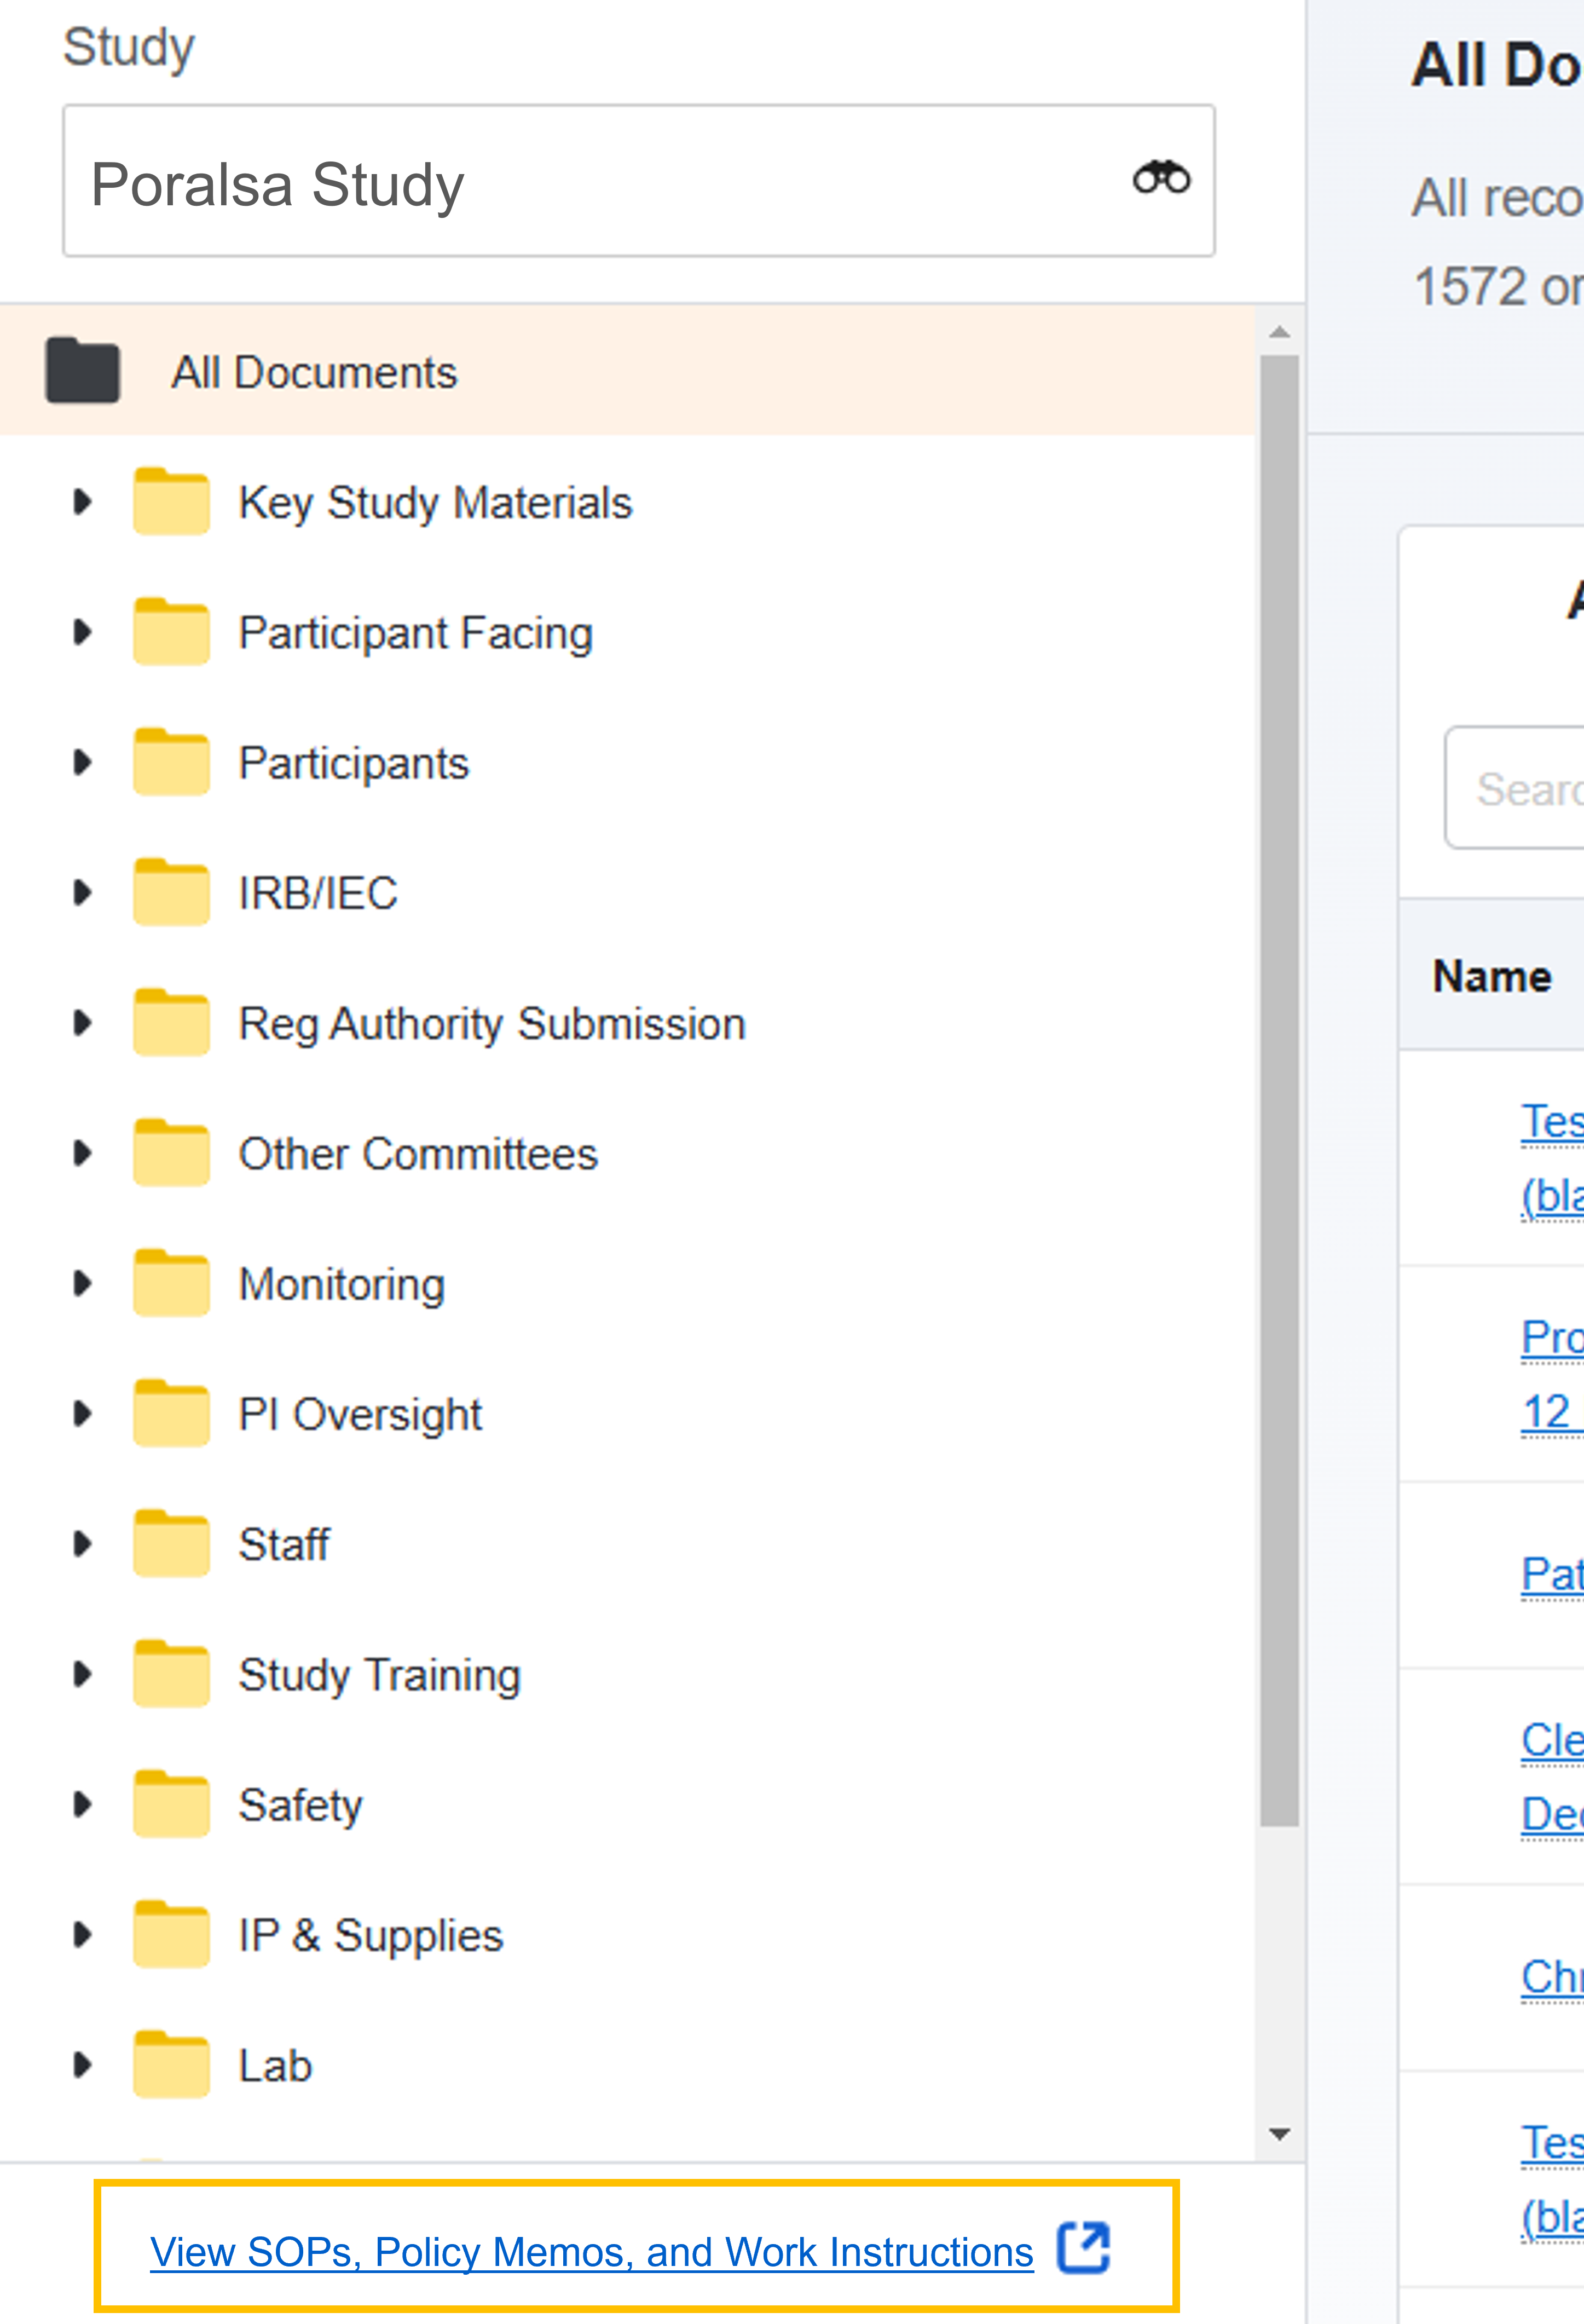
Site Documents Report
To review the site’s non-study-specific documents (standard operating procedures, work instructions, and policy memos), click the View SOPs, Policy Memos, and Work Instructions link below the Study eBinder folder list. This link will direct you to a report with links to all site documents shared with you. If the View SOPs, Policy Memos, and Work Instructions link is not visible in the Study eBinder, then you have not been granted access to those documents. Discuss your access options with the site staff.
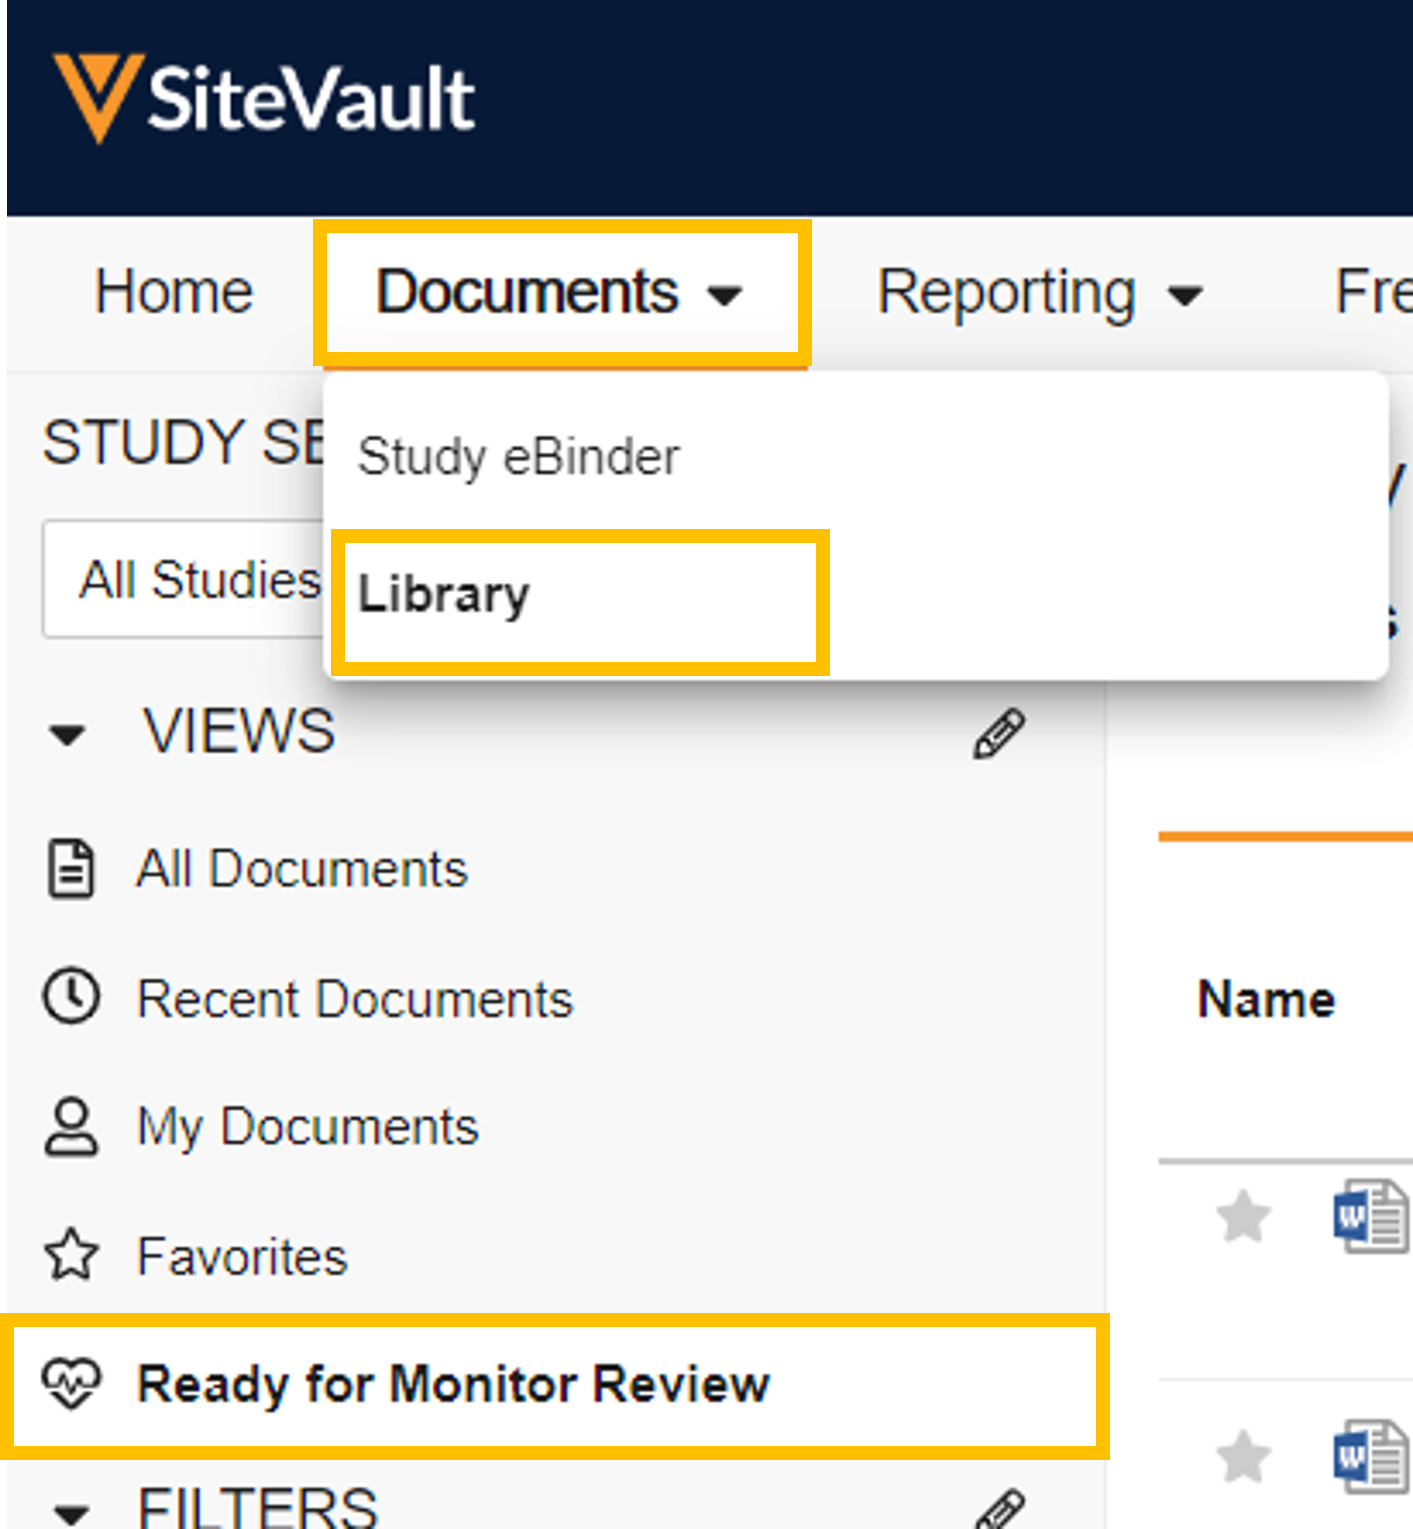
Library
Navigate to Documents > Library and select the Ready for Monitor Review view to view documents that are ready for review. Note that profile documents are not displayed in this view because they’re non-study-specific.
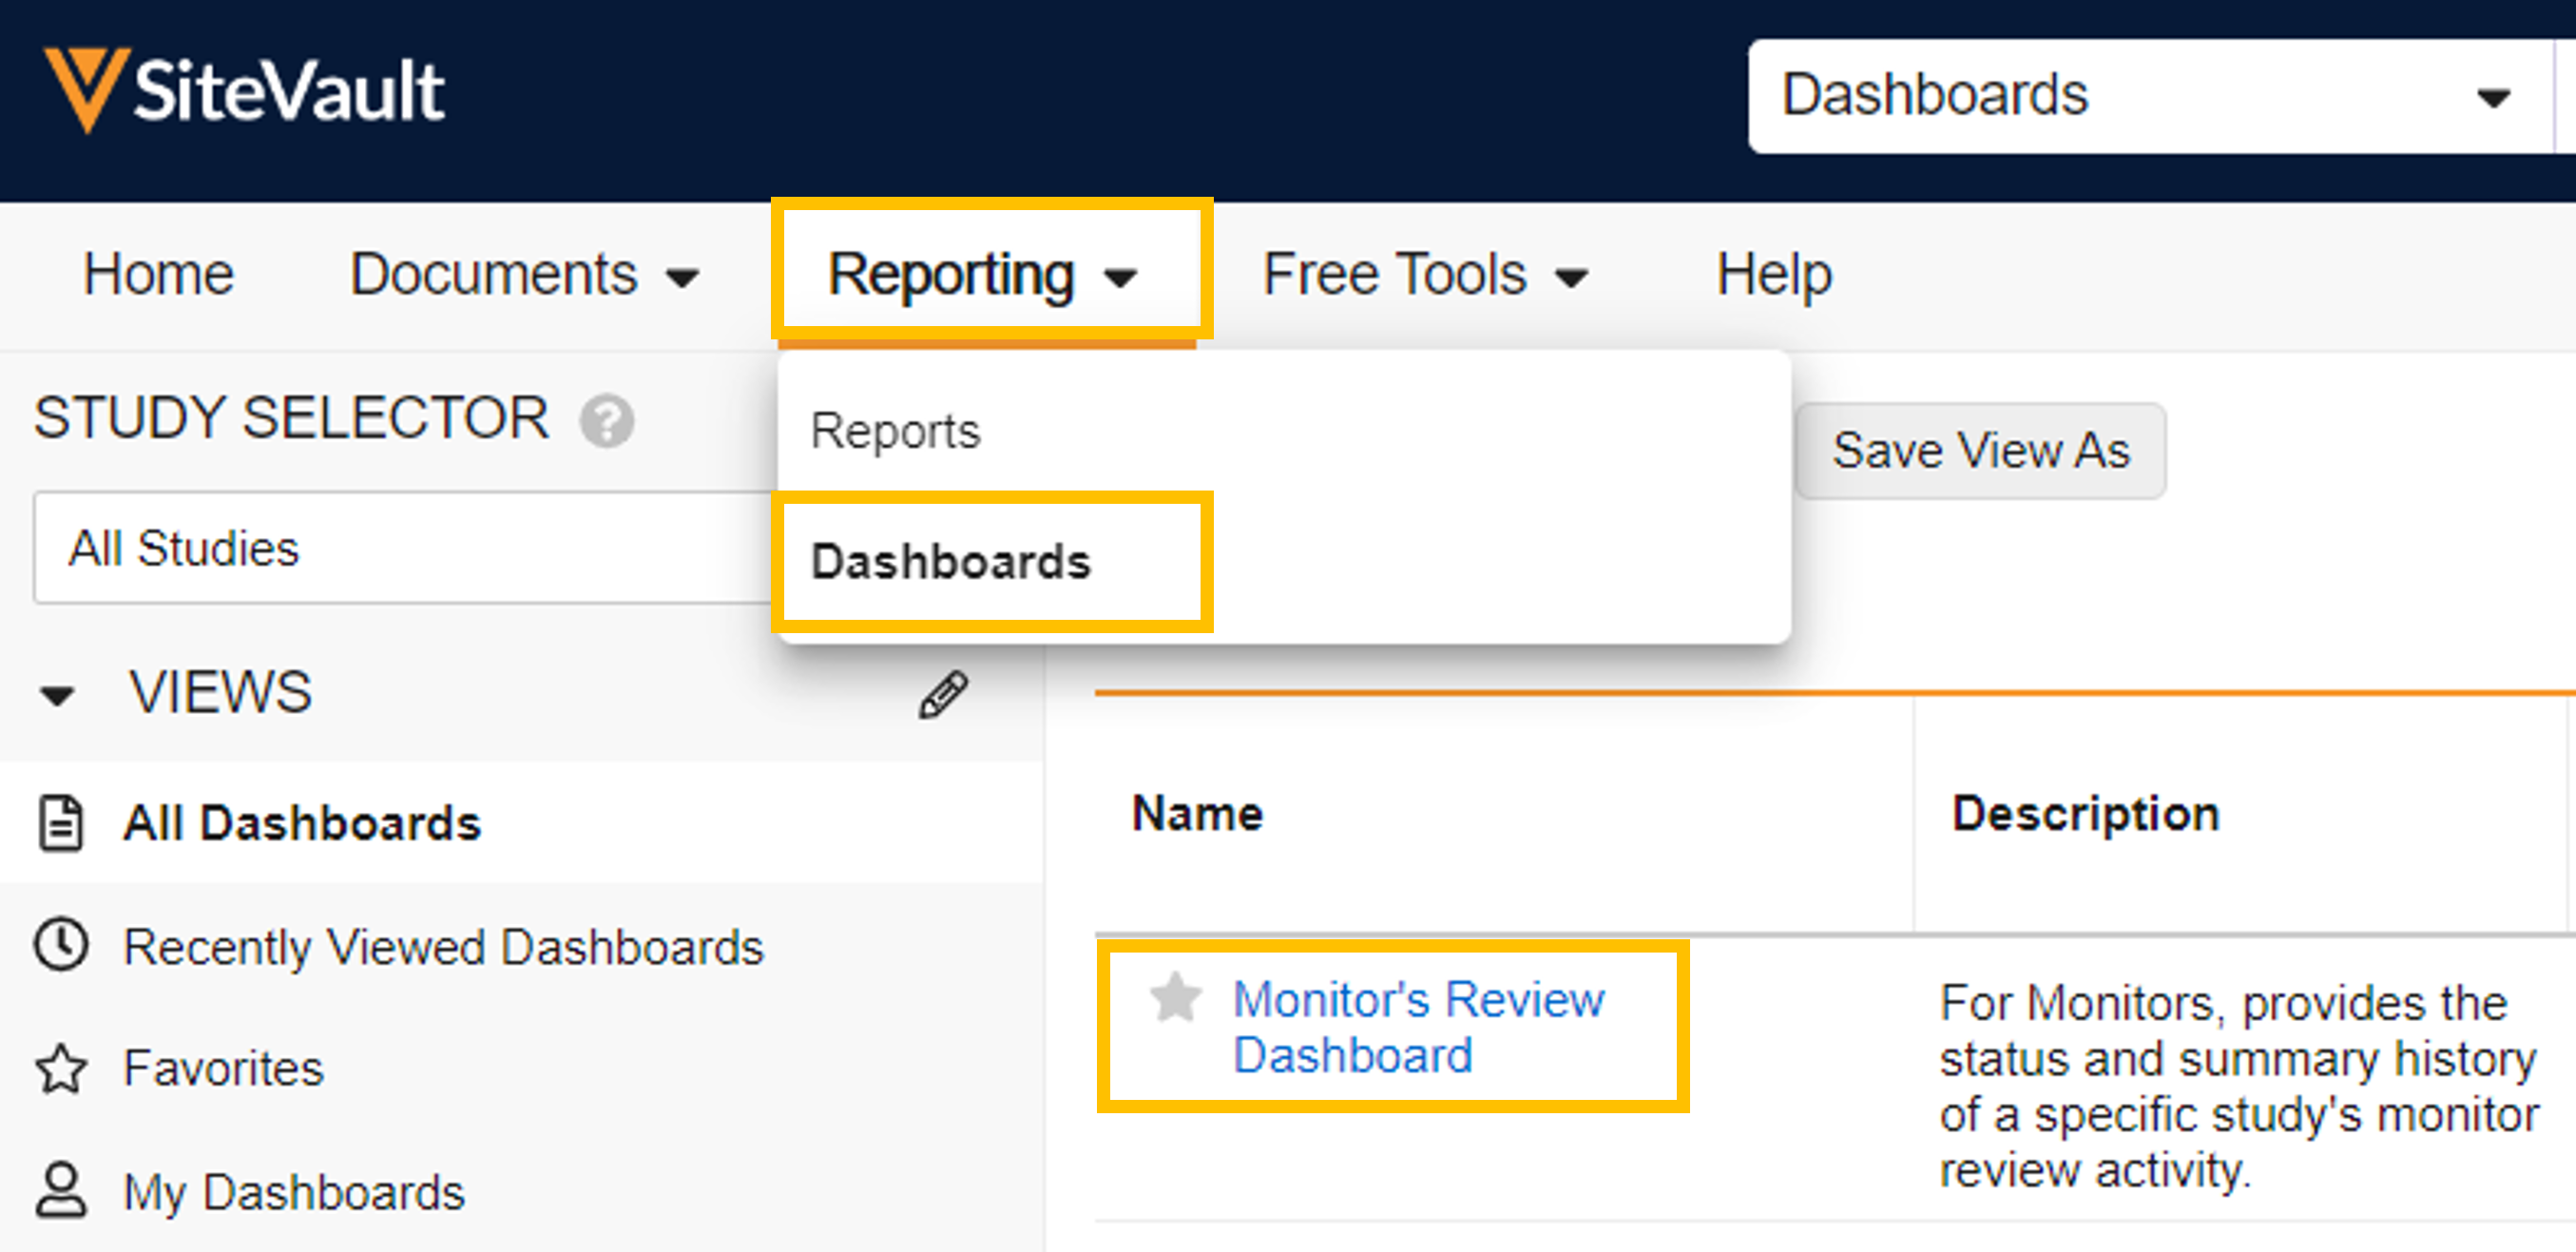
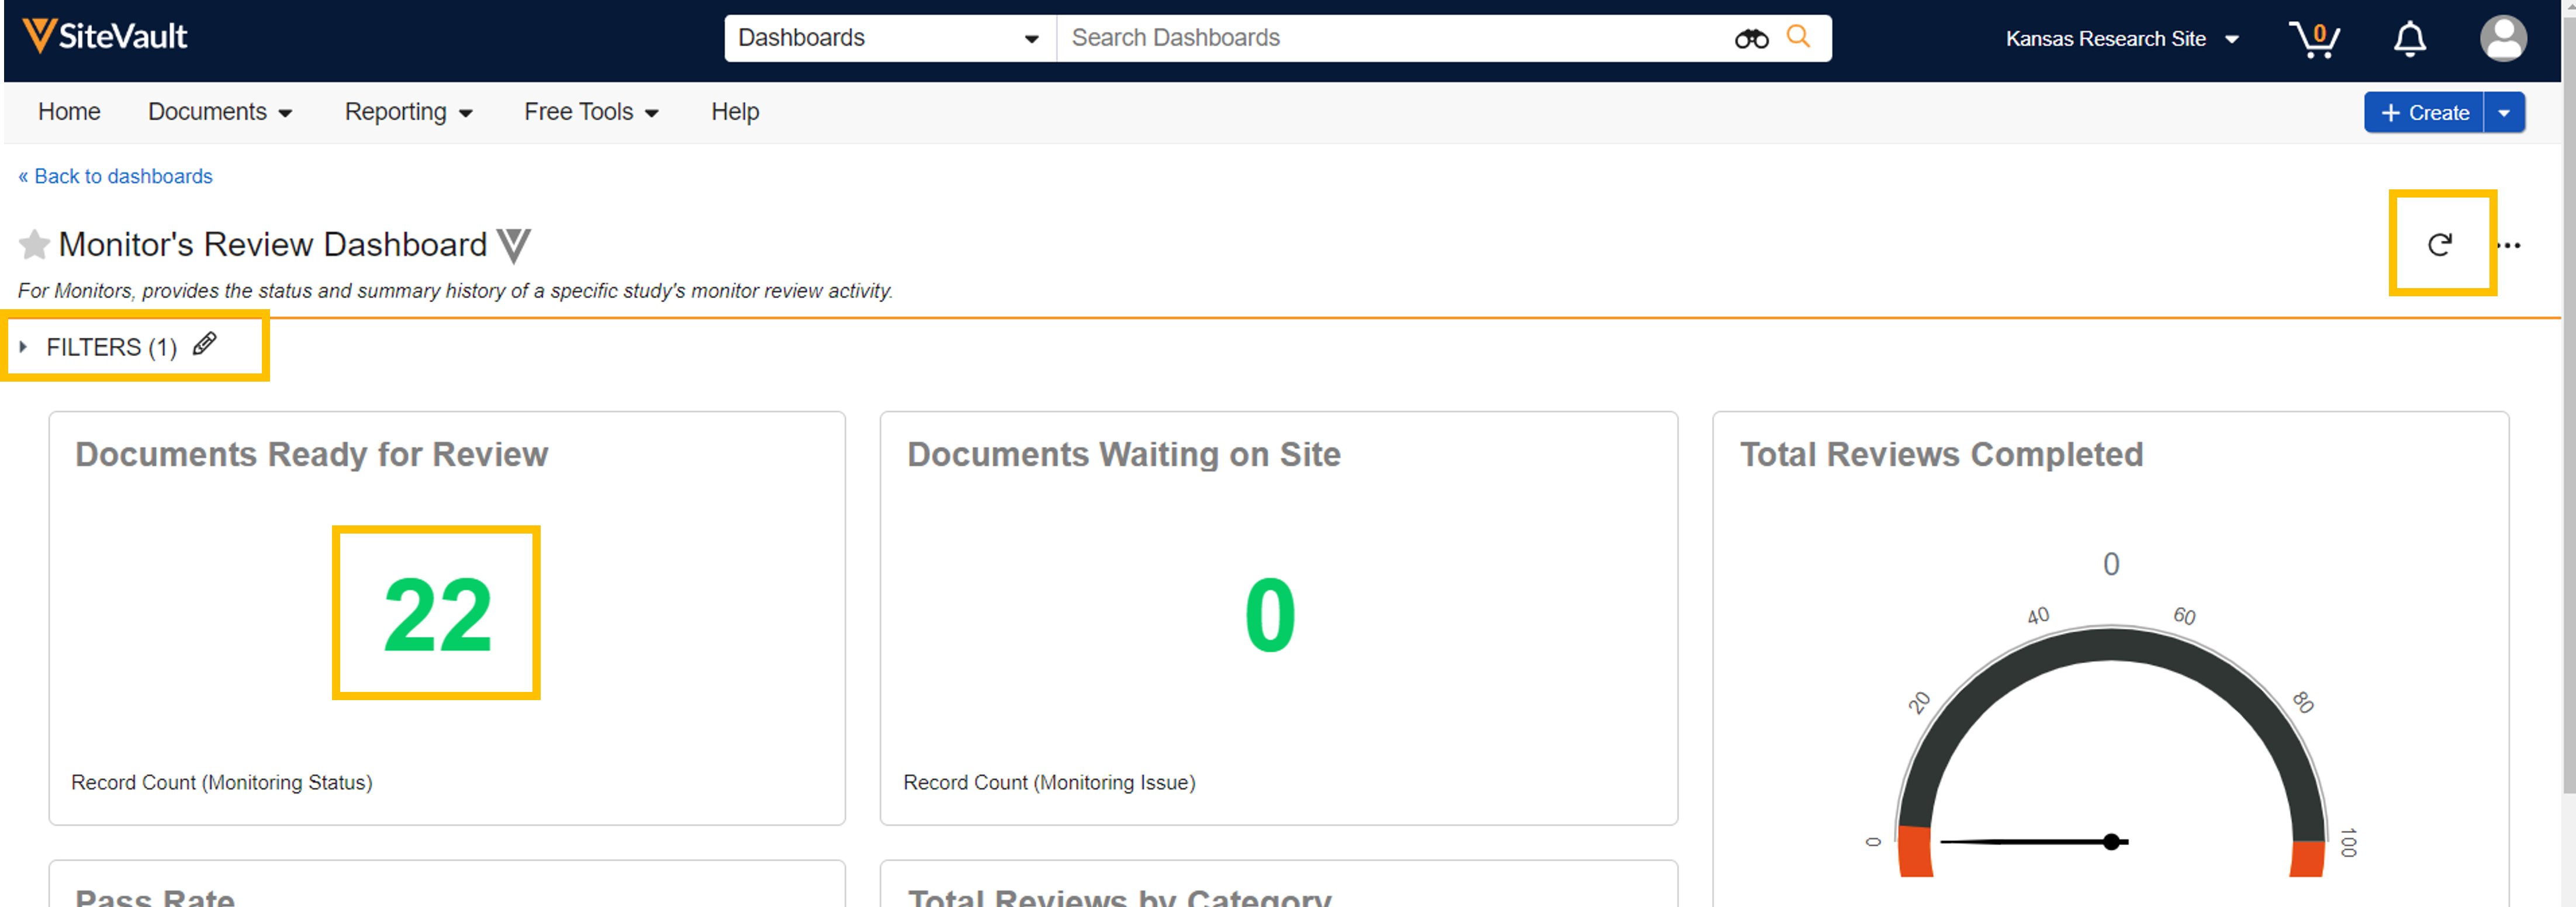
Monitor’s Review Dashboard
Navigate to Reporting > Dashboards and open the Monitor’s Review Dashboard. Select your study and then the Documents Ready for Review widget. This report displays a list of all documents ready for review.
Review Documents
The review process is completed in the Monitoring eBinder Document Viewer. You can page through the documents ready for review and update each document’s status without leaving the viewer. If an issue is found, use the Issues Found status to notify the site staff without stopping your review process.
- Navigate to the Study eBinder > Ready for Review. Ensure the correct study is selected.
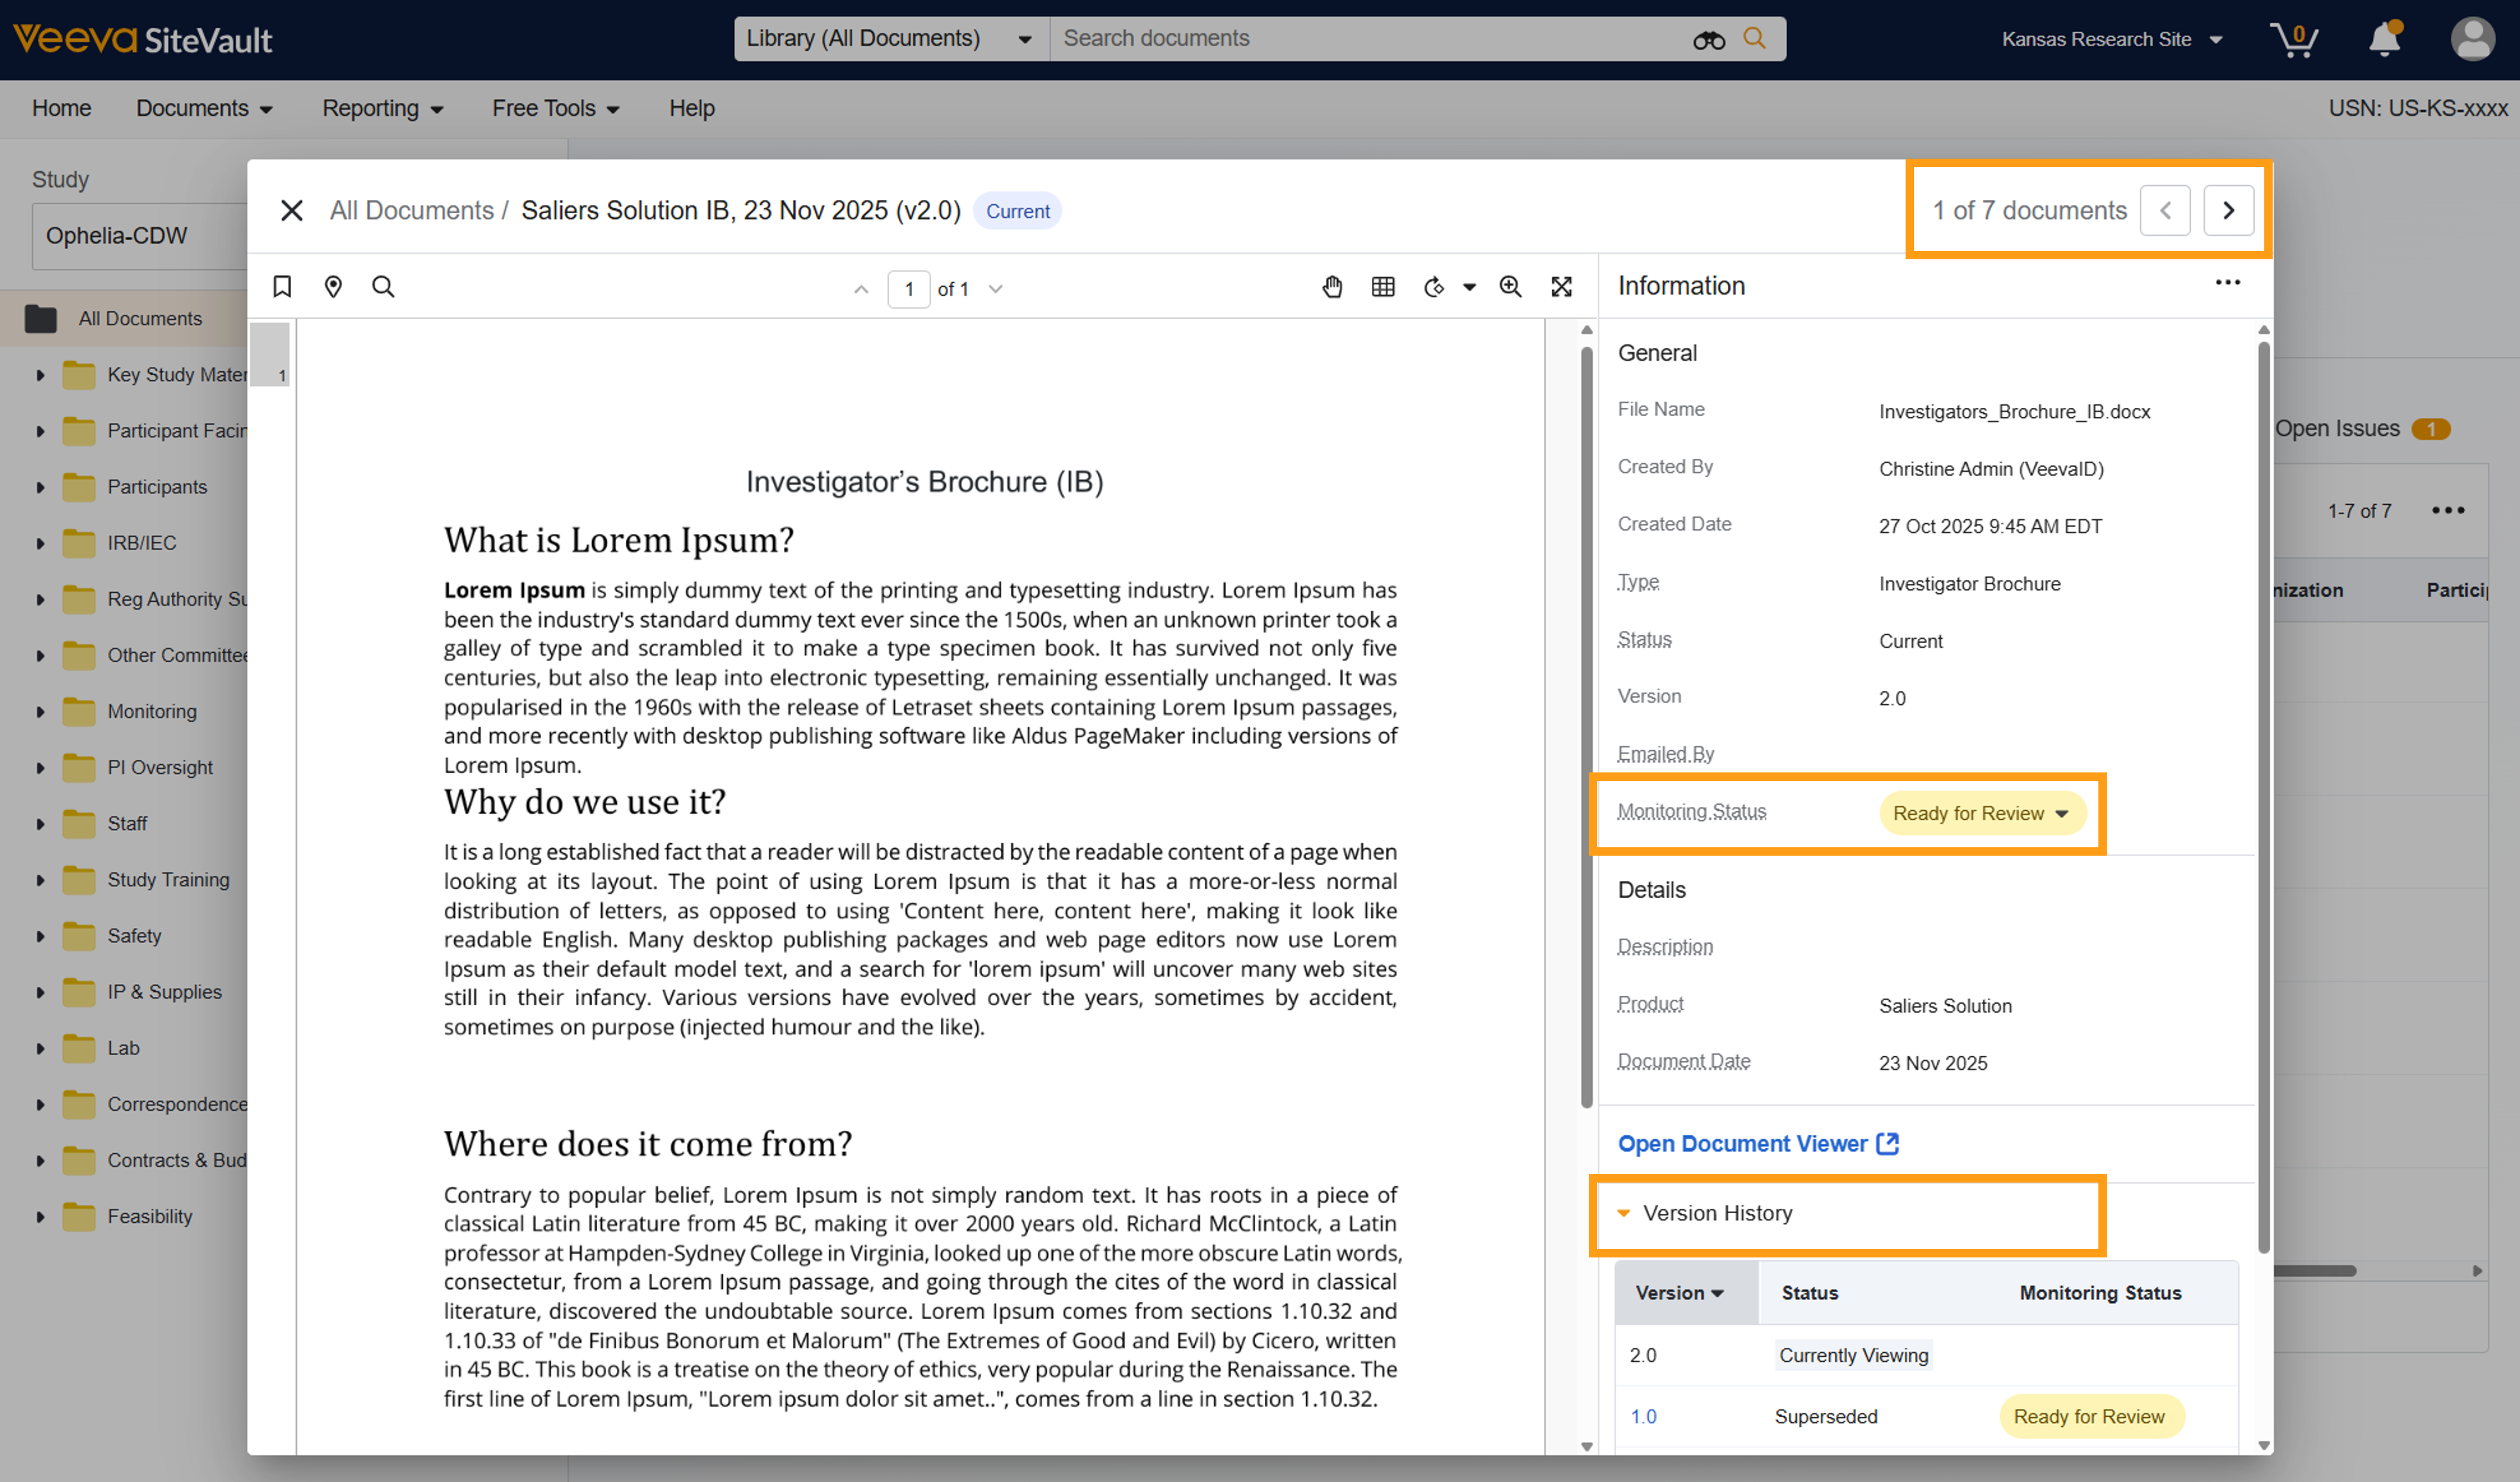
- Select a document to review. This will launch the Monitoring eBinder Document Viewer. Use the arrows in the top right to page between documents in the Ready to Review list.
- Review the document for pertinent information. Review the Information panel for eSignature pages and other versions of the document. To download the document, select the Actions menu (…).
- In the Information panel, select the appropriate Monitoring Status. Select from the following statuses:
- Ready for Review: All documents start in the Ready for Review state. Any document with a new version stacked will also start in Ready for Review. Previous versions will maintain their previous states.
- Issues Found: A monitoring issue related to the document has been identified and a prompt to log the issue is initiated.
- Issues Resolved: Indicates that any logged issues have been resolved by the site staff and are awaiting the monitor’s review of the resolution.
- Review Not Required: The document is in its steady or final state and does not require review.
- Reviewed, No Issues: The document has been reviewed by a monitor and no issues were found.
- If other versions of the document require a review and/or status update, they will appear as a row in the Ready to Review list. Or you can check by following the steps below:
- Select Version History from the current document’s Information panel.
- Select the version number to review.
- Review and update the Monitoring Status.
- Return to the newest version of the document to continue paging through the documents that are ready to review.
- Use the arrows in the top right to move to other documents.
Log Document Issues or Request a Missing Document
You can notify the site of a document concern by logging an issue. Issues are logged by changing the document’s Monitoring Status to Issues Found or by selecting Request Missing Document (available on all Study eBinder pages). You will receive a notification when the issue has been addressed by the site.
- Assign a document the Issues Found Monitoring Status or if a document is missing, select Request Missing Document.
- Provide details of the issue.
- Select Start.
Annotate a Document with Issue Details
When logging an issue, you can use the annotation tool to highlight the document issue details for the site staff.
To view or add annotations to the document, select View Annotations.
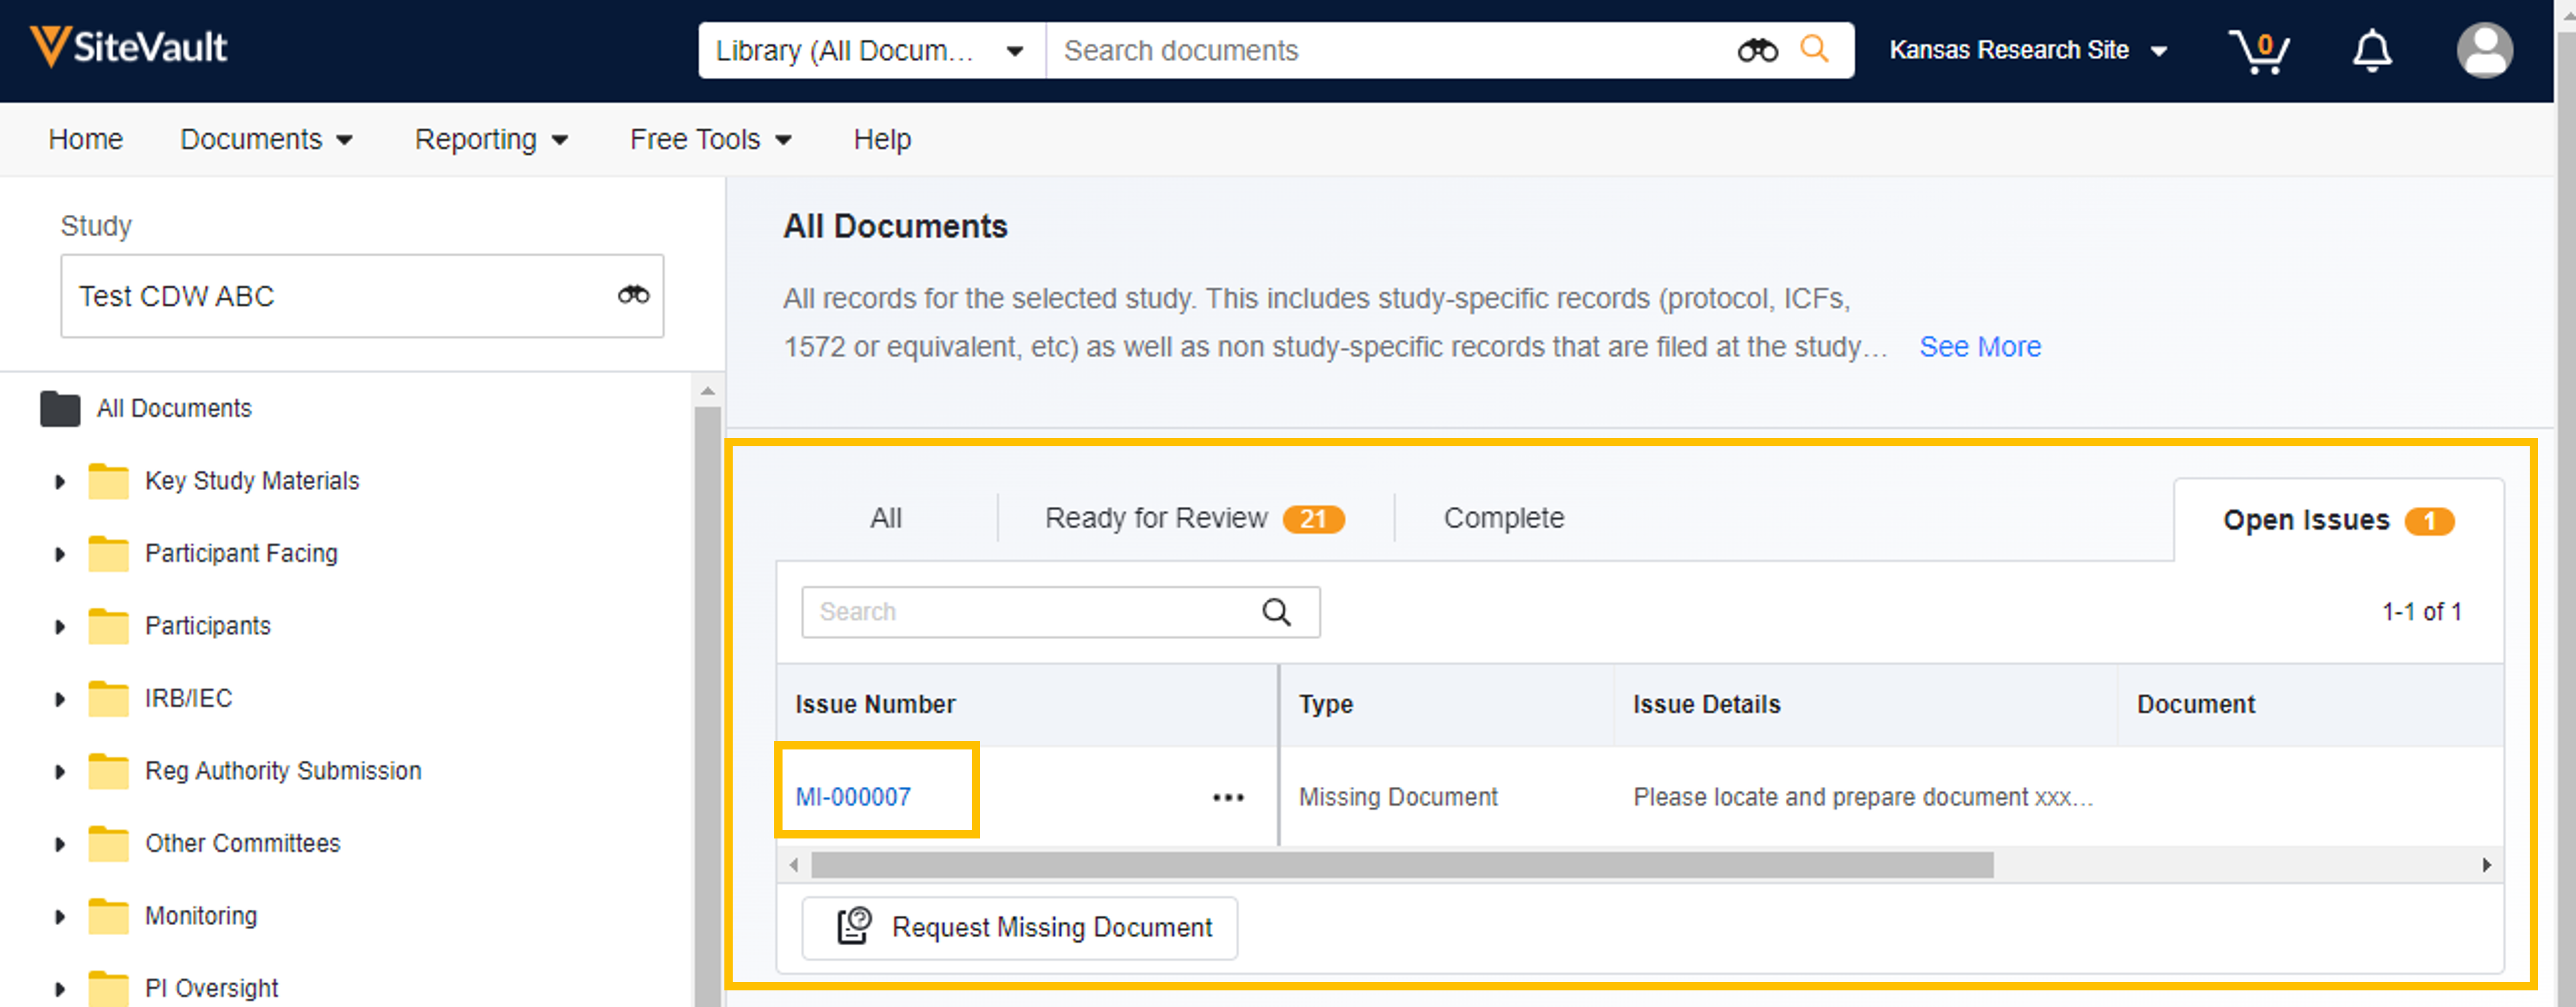
Review Issue Responses and Track Open Issues
The Study eBinder also allows you to review responses to issues, track open issues, and send reminder emails.
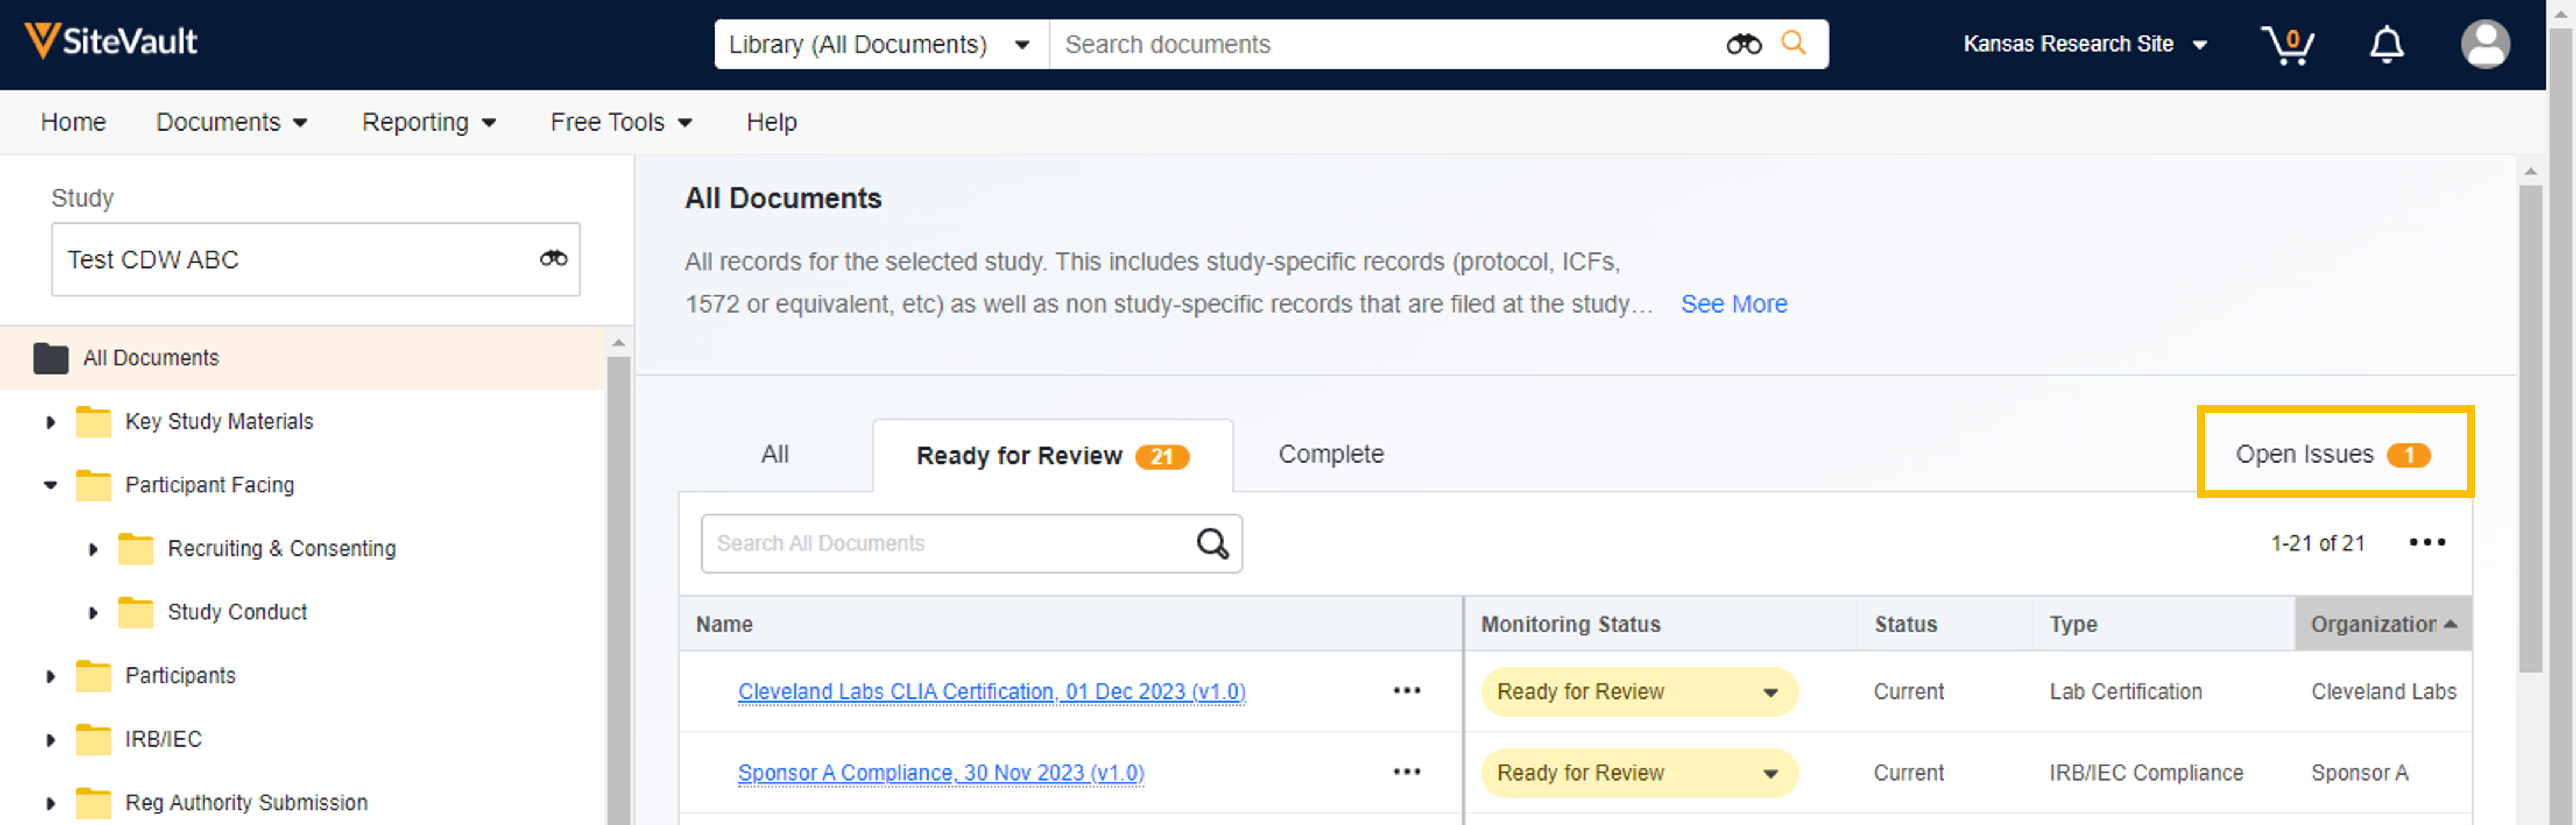
Issues are logged when a document’s Monitoring Status is set to Issues Found or if the Request Missing Document process was initiated. You can track open issues by selecting Open Issues from any Study eBinder page.
- Select Open Issues from any Study eBinder page.
- Select an Issue Number to review issue details.
- Complete any needed actions:
- From the All Actions menu, select from:
- Edit to edit fields in Details
- Download as PDF
- From the Workflow Timeline Actions menu, select from:
- Add Participants to include additional site staff in the issue workflow
- Email Participants to initiate an email with all issue workflow participants
- Cancel Workflow to cancel this issue and return this document’s Monitoring Status to Ready for Review

- From the All Actions menu, select from:
Monitoring Dashboards and Reports
For an overview of your documents and monitoring activities, SiteVault offers several reporting tools:
Monitor’s Review Dashboard
This dashboard is a standard dashboard and cannot be edited. However, you can make a copy of the dashboard (All Actions menu) and edit it to your preferences.
- Navigate to Reporting > Dashboards.
- Select Monitor’s Review Dashboard.
- Select and apply a study filter (required upon first access, edit as needed).
- Select the data or image in a tile to access the report providing the overview (available for most tiles).
Standard Monitoring Reports
SiteVault offers preset standard reports with data and tools often requested by monitors. Standard reports cannot be edited. However, you can make a copy of a report (All Actions Menu > Copy Record) and edit it to your preferences.
- Navigate to Reporting > Reports.
- Review the list of available reports. The Description column provides details of each report’s data.
- Select a report to view the data.
- The All Actions menu provides the following actions:
- Run in Background
- Copy Record (make a copy of the report and edit it to your preferences)
- Export options
- Audit Trail
- Sharing Settings
Create a Report
You can create your own SiteVault report, tailored to your preferences.
- Navigate to Reporting > Reports.
- Select the + Create button in the top right.
- Select + Report.
- Select the report type. This will determine the data available to you on the next page.
- If requested, complete any required fields.
- Provide a name for the report. If you skip this step, you can enter these details when saving the report.
- Optionally, provide a description of the report.
- Select the preferred format.
- Select Continue.
- Optionally, create any preferred formula fields.
- Optionally, create any preferred conditional fields.
- Optionally, complete any preferred filter details.
- Review Advanced Options for any applicable tools/settings.
- Select Run to run the report.
- If you are satisfied with the report settings or want to return to it later, select Save.
Notifications
You will receive a notification by email and in SiteVault when a site staff member completes your request to resolve an issue. You’ll also receive a notification if a site staff member mentions you in a comment.
To view your notifications, select the Notification Bell in the upper-right corner of SiteVault. You can select the View All link on the list to view all of your notifications on a single page along with any open tasks or annotation mentions.

Additional Resources
To access the content in this guide as well as more helpful tools, see the Monitor/CRA sections of the Monitoring tab.
If you need assistance, please reach out to our Site Support team.