Turn your uploaded PDF ICF into a digitized form your participant can respond to electronically by locating the participant’s actions on the form and dragging the matching elements onto the form’s image in the editor.
Add Signature Elements
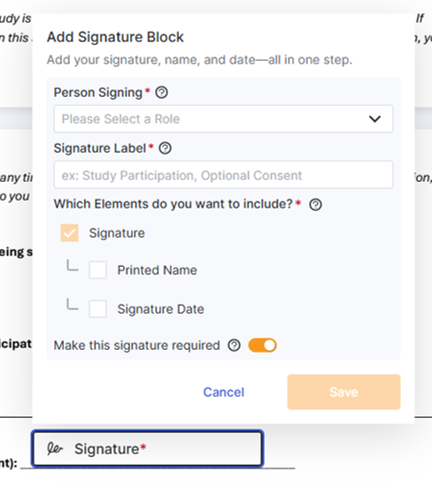
When you add a signature block to a consent form, the following signature fields are presented:
- Person Signing
- Signature Label
- Additional Options
- Printed Name
- Signature Date
- Make this signature required
Site Member Signatures (Countersignatures)
- Countersignatures require only the Signature element as site staff apply signatures using SiteVault’s eSignature function which already provides the printed name and signature date.
- For an eConsent to not require a site signature, the Site Member signatory role must not be selected during the eConsent form editing process.
- Drag the Signature element to the document.
- From the element window, select the role expected to complete this field.
- From the element window, complete the Signature Label.
- This label is visible on the Participant Additional Response tab and in the eConsent Data Export.
- From the element window, select any additional elements to associate with this signature.
- Site Member signatures require only the Signature element as site staff sign using SiteVault’s eSignature function which already provides the printed name and signature date.
- If the signature is required, toggle the Make this signature required switch.
- Note: Who signs a form is determined by who receives the form; marking a signature field as optional applies to the field, not the form recipient (signatory).
- Select Save.
- Drag each element to the matching area on the document.
- When the Signature element box is selected to reposition or resize, the element options are visible and editable.
- Resize each element to match the area provided.
- Adjust placement and sizing as needed.
Add Question Response Elements
To respond to questions, the following elements are available from the left menu to overlay on a consent form:
- Checkbox
- Radio button
- Text entry
Question and Answer Labels
These labels are visible on the Participant Additional Response tab and in the eConsent Data Export to easily locate specific responses. Consider this use as you create a labelling plan.
-
Question Labels: You can include the section or page number the question is on and a recognizable summary of the question. Ex. Pg12 Keep samples for future research
-
Answer Labels: Clearly indicate which answer was chosen and what that means for your team when working with that participant. Ex. Yes - agree to use samples
Add Checkbox
Use a checkbox to indicate that a particular option has been selected.
- Drag the checkbox element to the document.
- From the element window, select the role expected to respond.
- From the element window, complete the Question and Answer Labels.
- These labels are visible on the Participant Additional Response tab and in the eConsent Data Export to easily locate specific responses.
- If a response is required, toggle the Make this question required switch.
- Adjust checkbox placement and sizing as needed.
- Select Save.
Add Radio Buttons
Use a radio button when only one option can be selected from a group.
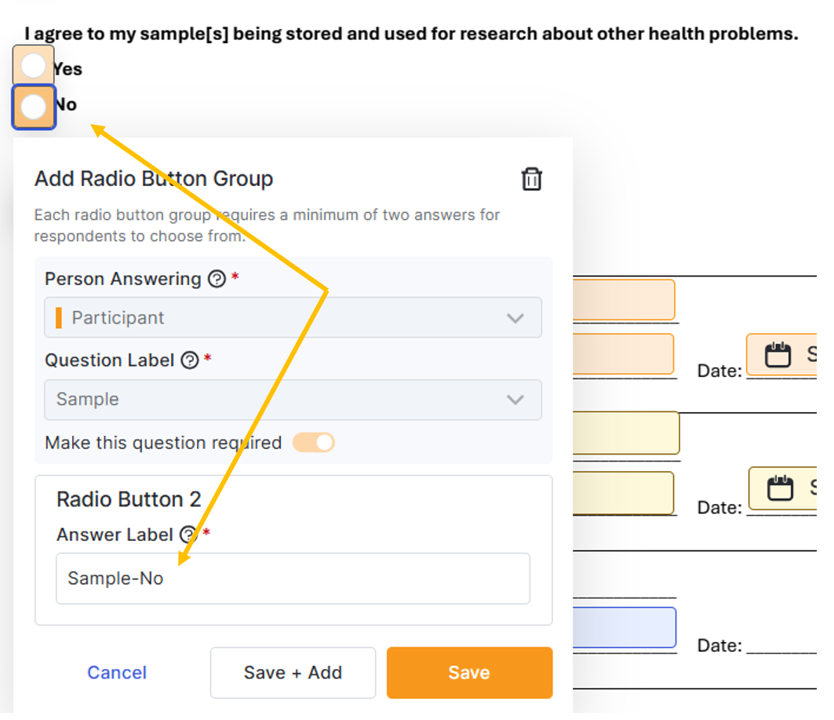
- Drag the radio button element to the document.
- From the element window, select the role expected to respond.
- From the element window, complete the Question Label field.
- If a response is required, toggle the Make this question required switch.
- From the element window, provide the Answer Label for Radio Button 1.
- This label is visible on the Participant Additional Response tab and in the eConsent Data Export to easily locate specific responses.
- From the element window, select Save + Add to create Radio Button 2.
- From the element window, provide the Answer Label for Radio Button 2.
- This label is visible on the Participant Additional Response tab and in the eConsent Data Export to easily locate specific responses.
- To include additional radio button answer options, Select Save + Add and complete the Answer Label field. Repeat as needed.
- Adjust all radio button placement and sizing as needed.
- Select Save.
Add Text Entry Field
Use a text entry field when the expected response to a question is freeform text, such as a phone number or initials. Drag the text entry element to the document.
- Drag the text entry element to the document.
- From the element window, select the role expected to respond.
- From the element window, complete the Question Label.
- This label is visible on the Participant Additional Response tab and in the eConsent Data Export to easily locate specific responses.
- From the element window, complete the Preview Text field by entering guiding text indicating what is expected in the response. Ex. Name, Address, Phone Number.
- If a response is required, toggle the Make this question required switch.
- Adjust field placement and sizing as needed.
- Note: Content under a text entry box is hidden; expand boxes that will likely require longer responses, but ensure that all important information remains visible.
- Select Save.
Editor Settings and Tools
Find these key tools in the top, right of the screen.
Document Settings
- MyVeeva Display Name: The name of the form that the participant will see in MyVeeva for Patients. If left empty, the SiteVault document title will be displayed.
- Require an unlock code to sign: Toggle to On if you want to require participants to enter a site-provided unlock code to sign the form. For more information, see Require an Unlock Code to Sign.
- Require a hand drawn signature: Toggle to On if you want to require participants to draw their signature instead of clicking or tapping to sign. For more information, see Require a Hand Drawn Signature.
- Signing Order: If using a signing order, enter the form’s place in order. For more information, see Require a Signing Order.
Preview the Form
Preview eConsent will provide a participant’s view of the form. To see or share this view once editing is complete, see Preview and Share an eConsent Form.
Save Your Changes
When you are done editing, select one of the following options:
- Save: Select to save your changes and create a new version in SiteVault without ending your editing session. Saving to SiteVault allows other staff to view the progress you’ve made. If another user needs to edit the form, check in the document.
- Save and Exit: Select to save your changes and check in the document, creating a new version. The document is unlocked in SiteVault, so others can edit it or send it for review.