Even if you import consent content by uploading a DOCX form, your form still requires manual adjustments in the Custom eConsent Builder for content structure and signature details. The Builder is an extension of SiteVault and will open in a new tab.
Please note that editing an IRB-approved document may require an additional review. To instead use the PDF-based eConsent Editor to overlay consent elements on your IRB-approved consent form, use Save As to save a Word (DOCX) as a PDF and use the PDF-based eConsent Editor.
Edit a DOCX eConsent
- Navigate to Studies.
- Select the study.
- Select the Consent Forms tab.
- Locate the document and select Edit eConsent from the Document Action menu. This action opens the Custom eConsent Builder and checks out the form, preventing other users from editing the document.
- Edit using the tools below these steps.
- When you are done editing, select one of the following options:
- Save to Vault: Select to save your changes and create a new version in Vault without ending your editing session. Saving to Vault allows other staff to view the progress you’ve made. If another user needs to edit the form, check in the document.
- Check In: Select to create a new version and end your editing session. The document is unlocked in Vault, so others can edit it or send it for review.
Action and Settings Menus
Find these key tools in the top, right of the screen.

Document Action Tools
- Import: Import consent forms into the Custom eConsent Builder to overwrite all content of a previously-uploaded document. For more information, see Import Consent Forms in the Custom eConsent Builder.
- Web Preview: Preview how the eConsent form will be displayed to participants in MyVeeva for Patients. This preview is viewable to only you as the logged-in user. It includes your current content in the Builder at the time you open it. Select the icon again to open a refreshed view. To share a preview of the form with external readers, see Preview and Share an eConsent Form.
- Downloads:
- From the Builder, select the Download PDF or Download Word Document icons.
- From Preview Mode, select Download PDF or Download Word Document from the Actions menu (…).
- When you download a Microsoft Word document, SiteVault adds special formatting around the signature and question blocks to ensure that they can be imported as the correct content block type. To ensure that the formatting is retained, edit only the content in the blocks; do not delete and replace the blocks.
- If you notice that a section or page is separated from its content by a page break in a PDF document, add lines at the end of an earlier block to force a page break in the document.
Save Your Work
The Builder automatically saves your changes every 30 seconds. You only need to save to SiteVault if you want to create a new version or share your draft in SiteVault.
- Save to Vault: Save your changes and create a new version in SiteVault without ending your editing session. If another user needs to edit the form, you’ll need to check in the document from the Builder instead.
- Check In: End your editing session and create a new version of the document in SiteVault.
For more information on saving and checking out eConsent documents, see Saving and Checking Out eConsents.
Table of Contents
This area provides an outline of the current content as well as tools to create sections and content blocks in the form. You can view, move, remove, and add content blocks here. Click the + tool to add sections and blocks. See the instructions below in the Add Content section.
Settings
- Require an unlock code to sign: Toggle to On if you want to require participants to enter a site-provided unlock code to sign the form. For more information, see Require an Unlock Code to Sign.
- Require a hand drawn signature: Toggle to On if you want to require participants to draw their signature instead of clicking or tapping to sign. For more information, see Require a Hand Drawn Signature.
- Signing Order: If using a signing order, enter the form’s place in order. For more information, see Require a Signing Order.
- Edit Header/Footer: Headers and footers can help manage printed documents and keep them in order.
- Update the column boxes to include the information to be displayed. You can add an image or text in each column.
- Note: Header and footer images are added when you import a document. If you want to edit or add an additional image in the header, follow the steps in the Working with Media section below.
- Page Count
- Enter [[curr_page_num]] where you want the current page number to be displayed in the footer, and enter [[total_page_nums]] where you want the total page count to be displayed. You can add any text you want around the number values or translate it for different languages.
- Ex. If you enter
Page [[curr_page_num]] out of [[total_page_nums]], the page count is displayed as Page 1 out of 15.
- Right to Left Language: Toggle to On if you want the UI elements to be mirrored for right to left languages.
Add Content
Considerations for Content Organization
To avoid overwhelming the reader, break your ICF into multiple sections and content blocks. Doing so ensures that participants and caregivers view each section and more easily consume the information. You can copy and paste an entire document into a text box then select the Split Content icon to break the content into blocks quickly.
If you have longer, more complex content (for example, large tables or specially formatted lists or text), split the content into its own block. This makes it easier to move the content and change its formatting independently of the other content blocks.
We recommend that you keep tables simple on eConsent forms. A complicated table with many columns or tables within tables is difficult for the participant to view on a mobile device or small screen. Additionally, the table may be narrow and difficult to read if presented in a PDF file in SiteVault and MyVeeva for Patients.
General Navigation
Use the Table of Contents to manage and navigate through the content structure of the form. Enter the content into the form and use the text formatting toolbar to style as needed.
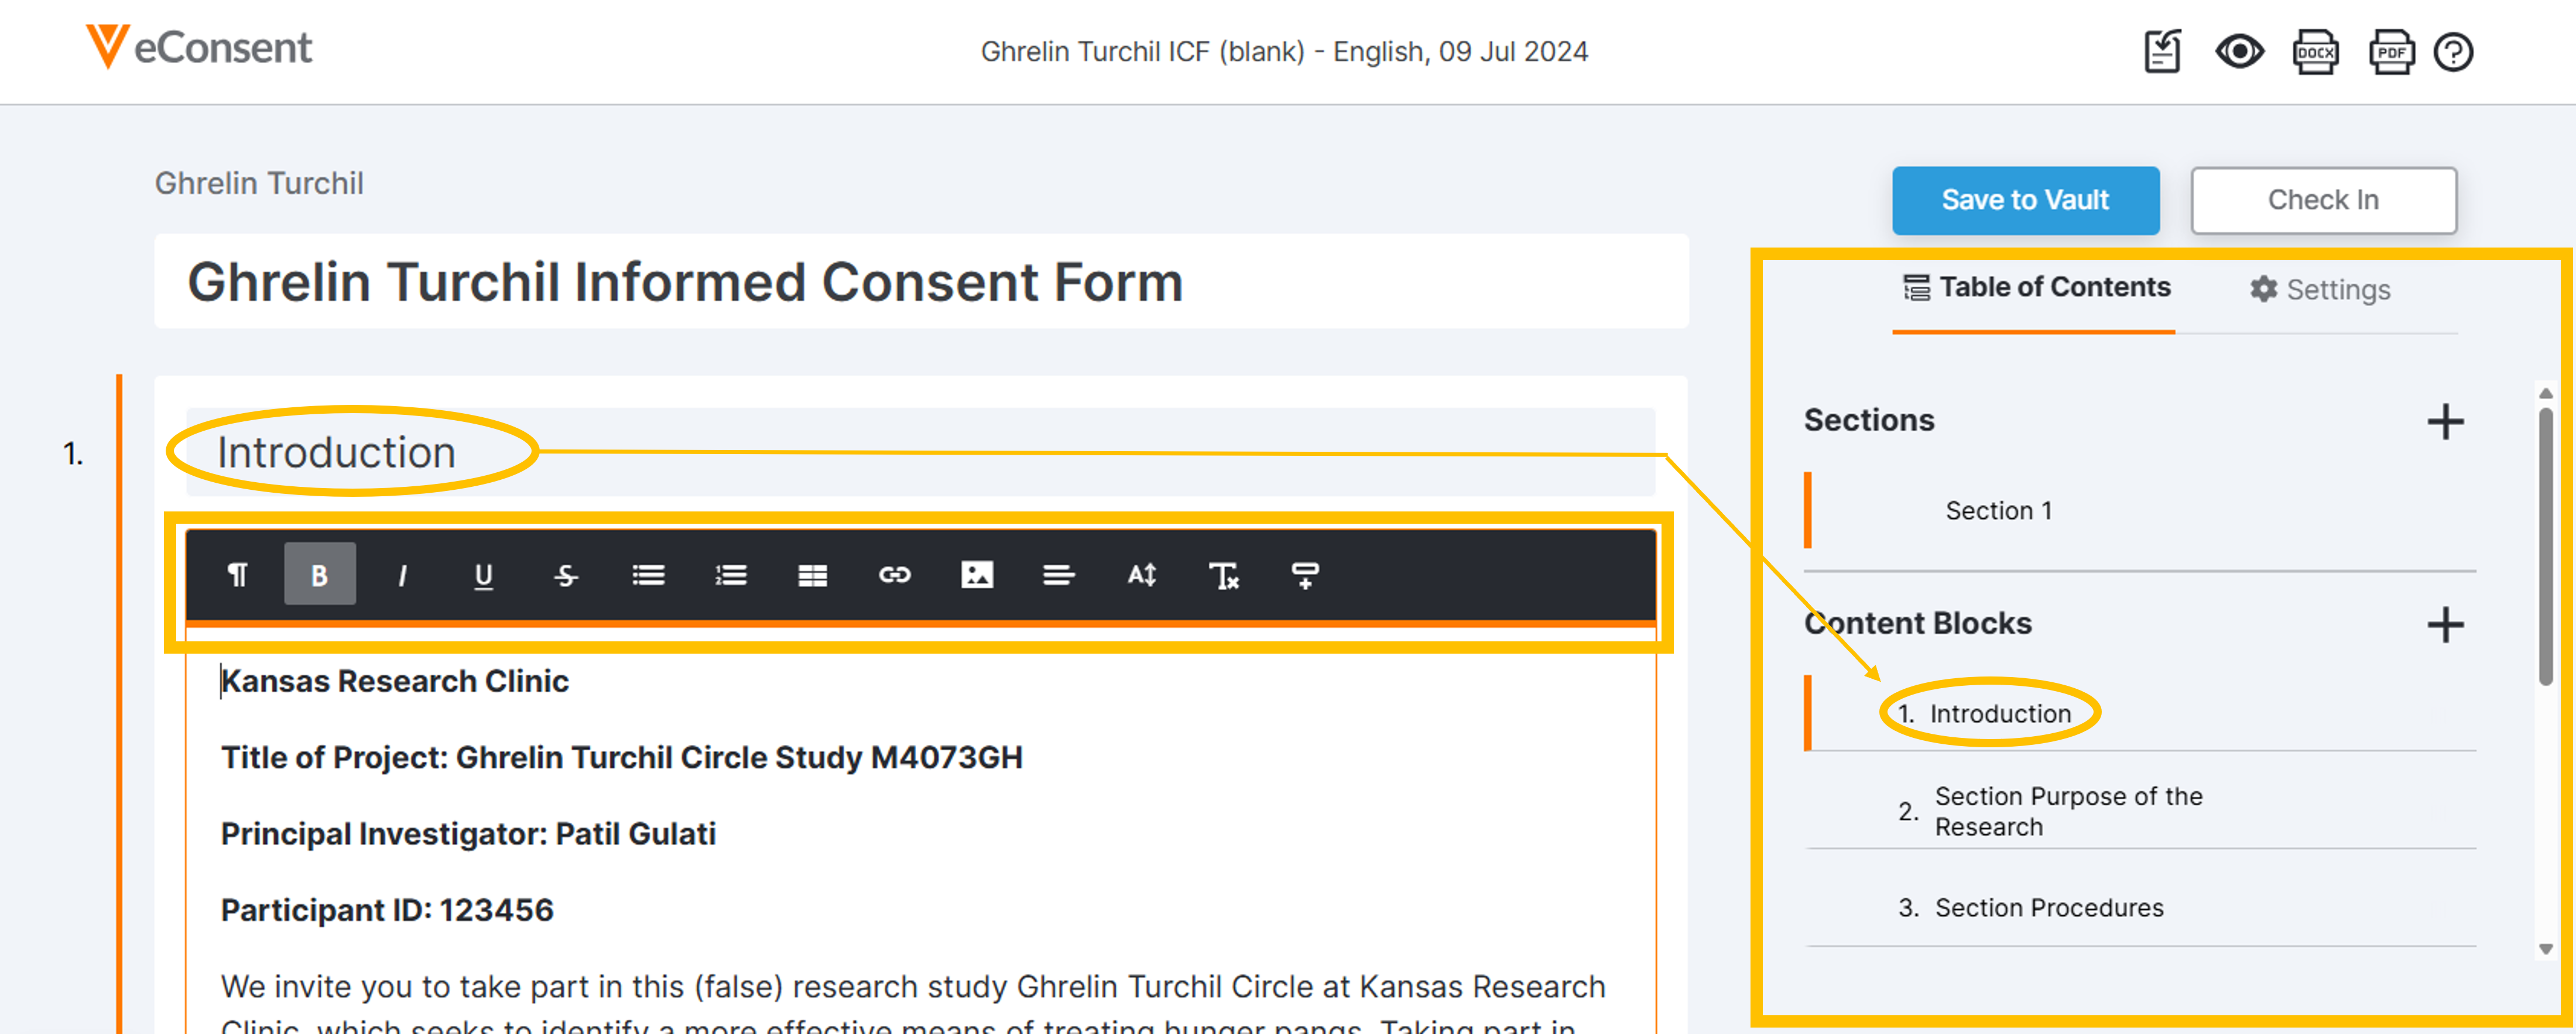
Use the Table of Contents to manage the following document actions:
- Select + to add items.
- Select items to navigate to them on the document.
- Drag items to rearrange.
- Select the Remove icon to remove an item.
Document Title
- Enter the participant-viewable title, for example, Main Informed Consent Form.
- The title can be up to 150 characters. If the preferred title is too long, shorten it in the title and include the full title in the document’s text.
- The title is not saved to a field in SiteVault. To view the participant-friendly title when you select an ICF to send to a participant, add the title to the document’s Description document field.
Sections
- To specify a title for a section, enter it in the title box (100-character maximum).
- The section title box isn’t displayed if the document has only one section. If the document includes multiple sections and you don’t specify a title, Section [#] is used as a default title in both the Builder and MyVeeva for Patients.
Content Blocks
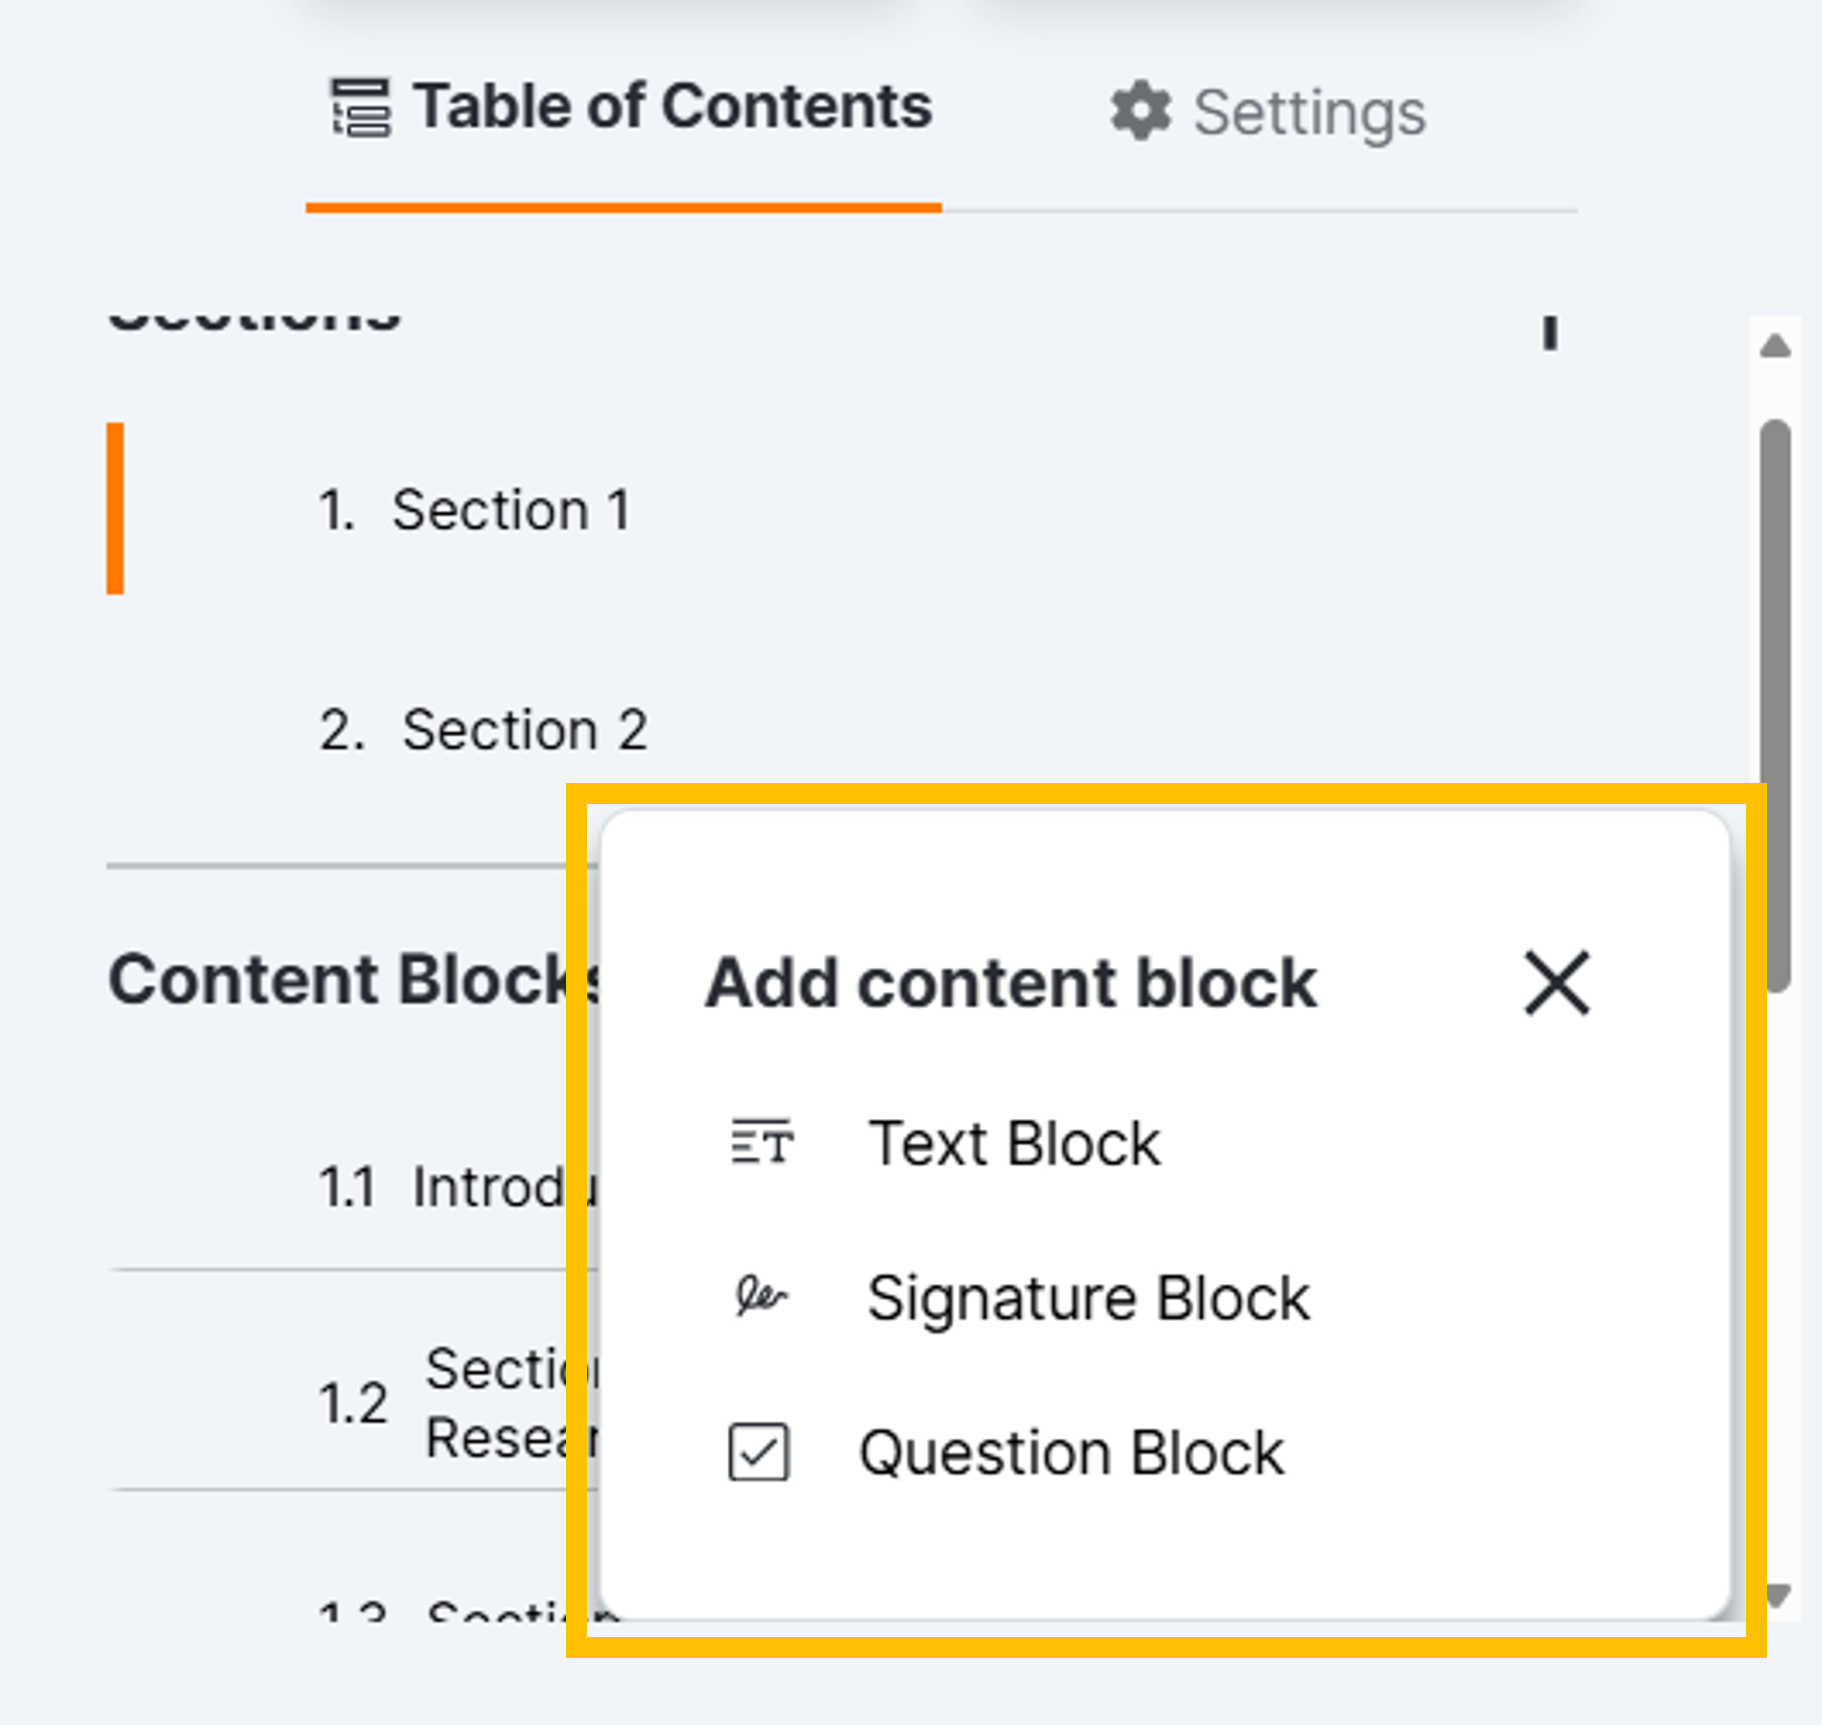
- While viewing the section to which you want to add a content block, select the Content Blocks + and select the appropriate type.
- Optionally, enter a title for the content block in the title box (100-character maximum).
- Select any additional settings as needed. See the Content Block Types and Content Block Settings sections below for more information.
Content Block Types
| Type | Description |
|---|---|
| Text Block | The text formatting toolbar is displayed when you click into or select text in a text content box. Similar to other text editors, browsers undo your edits to the current field then continue to the most recent fields you edited when you press CTRL+Z in the editor. If you undo edits to one section or content block, make sure you do not undo changes elsewhere on the page.
When you include carriage returns in the text editor, we recommend that you press SHIFT+ENTER to minimize white space in longer documents. Pressing only the ENTER key will add more space for clearer paragraph separation. |
| Signature Block |
The signature content block allows you to add places for signatures and optional text content above them. You can add two signature blocks for the Witness, Guardian, and Caregiver roles, and one signature block for all other roles that might need to sign a consent form. The site approver signs in SiteVault after all the included roles sign in MyVeeva for Patients. If necessary, you can make an eConsent form template to accommodate study countries that require wet-ink signatures by adding a Site signature block to the form. |
| Question Block | The question content block allows you to insert a question and its response options. You can also add text content above the response options. If you want to specify who is able to answer the question, you can select a specific role for the question block. |
Content Block Settings
| Setting | Types | Description |
|---|---|---|
| Role | Question, Signature | Select the role for the signature block from the Role list. The following role options are available for question and signature blocks:
If a question applies to all reviewers, leave Default as the selected Role option in the question block. Selecting the Default Role option will assign the question to the recipient according to the highest rank as ordered below:
You can only add one signature block for all roles, with the exception of the Witness, Guardian, and Caregiver roles, which you can add up to two signature blocks. However, you can also add as many role-based question blocks as you need to. You can add a signature block for any role that is responsible for signing the consent form. If a role has a signature block in a consent form, an existing reviewer with that role receives the consent form if the site coordinator sends it for that role. Note: When necessary, a document supports signature capabilities for two Witness, Guardian, and Caregiver role recipients without needing additional document configuration. Wet Ink: To have a single eConsent form accommodate multiple study countries with differing signature regulations, you can add a Site signature block to the form. In study countries that require wet-ink signatures, you can print the blank eConsent form and have the participant and signatories sign their applicable signature blocks in wet ink. Site staff can then countersign the Site signature block in wet ink, scan the form, and upload it as an Informed Consent Form (signed) document type. For more information, see the Collect Consent Signatures in Wet Ink section on the Start Consent page. |
| Show Title | All |
Deselect the Show Title checkbox if you want to hide a content block's title. The checkbox is selected by default when you add a content block. If you hide the title or do not enter one at all, no heading for the block is displayed in MyVeeva for Patients or the .PDF files. Instead, the content block is added to the previous content block or section. |
| Show Text Content | Question, Signature |
Deselect the Show Text Content checkbox if you want to hide the block's text content. If you do so, the text content you entered is still saved but is not displayed in MyVeeva for Patients or the .PDF files. You can reselect the checkbox to display the content. The checkbox is selected by default when you add a question or signature block. |
| Required Response | Question |
Toggle Required Response to on if you want participants to be required to answer a question before they can sign and submit the eConsent form. Questions with more than one response option are required by default, and you cannot make questions with only one response required. |
| Responses | Question |
You can modify a question block's responses in the following ways:
|
| Signature Name, Question Name, and Answer Name | Question, Signature |
The signature, question, and answer names are displayed in the response records for participants and used in SiteVault reporting. You can either enter a name of up to 128 characters or use the default. The system uses the first 40 characters of the body text as the default name if text is present. If no text content is present or you remove the name, the system uses a default name such as "question_1". The names are displayed in SiteVault. You can use the names to aggregate response data across separate documents and studies when you create reports. We recommend that you use unique names in a data set for easy organization and reporting. For more information, see View eConsent Form Responses |
| Signature, Printed Name, and Date Labels | Signature | You can edit the signature, printed name, and date labels on signature blocks to add custom labels or translations to them. For Site signature blocks, you can edit the site signature placeholder label. Each label has a maximum character limit of 50. By default, the signature, site signature placeholder, printed name, and date labels are in English. |
Working With Media
You can use images and videos to include helpful visuals on eConsent forms such as device diagrams, visit schedules, and instructions. Videos can be used to further explain study-specific or general medical topics to the participant, for example, the phases of a clinical trial, a summary of informed consent, or an overview of what an MRI entails.
Adding Images and Videos
Note: If you upload videos from a Word Document, they are added in the editor as an image of the first frame of the video. You can replace the image with the video in the editor. If you download an eConsent form that includes a video, and then import it later, the video is imported as expected.
Complete the following steps to add an image or video to the eConsent document:
- Select the Media icon on the text editor’s toolbar.
- Either drag-and-drop an image or video in a supported format into the box, or select Browse and select a file. The maximum file size is 2 MB for .JPG, .PNG, and .GIF files and 500 MB for .MP4 files.
- If you are adding an image, enter a description in the Description box. This description is used as alternative text for screen readers and accessibility for users in MyVeeva for Patients. See Alternative Text on the WebAIM website for more information about writing high-quality alternative text.
- If you are adding an image and want to align it a specific way, select an option in the Alignment section.
- Select Add Media.
Editing Images
Complete the following steps to change, realign, or edit the description of an image:
- Select the image, then select Edit in the upper-right corner of the image.
- Make any updates as necessary.
- Select Update.
Note: You cannot edit videos. If you want to change an included video, remove it and add a new one.
Removing Images and Videos
- To remove an image, select it and press BACKSPACE (DELETE).
- To remove a video, click to the right of it and press BACKSPACE (DELETE).
Word Document Formatting Requirements
Review the following requirements before uploading a Word document (DOCX) to SiteVault:
| Item | Requirement Description |
|---|---|
| Styles | For a successful import, **you must add styles to your Word document before uploading** to place content accurately. Complete the following steps in Microsoft Word:
|
| Images and Videos |
|
| Tables |
|
| Tracked Changes | Before importing, accept or reject tracked changes, otherwise edits and original text are both added as text in the document. |
| Unsupported Items | The items below are not supported. Remove them from your document before uploading for the best upload experience.
|