Set Up a Study
Steps to setting up a study
Introduction
This guide walks you through the initial steps of setting up a study in SiteVault. To access the content in this guide as well as more helpful tools, see the Studies tab.
Pro Tip: To launch linked pages without losing your place in the guide, right-click links and select to open in a new tab.
SiteVault Help
SiteVault Help is packed with detailed articles, FAQs, and even video tutorials to answer any questions that might come up along the way. Getting comfortable with our help system will be a valuable skill as you continue to use SiteVault.
- Explore the site to become familiar with navigating the different sections.
- Use the search bar to quickly find answers to specific questions.
- Use the Chat widget to reach out for additional support.
Additional Support
If you need assistance, please reach out to our Site Support team.
Study Overview
Study records capture critical information about your site’s studies such as study team assignments, partner organizations, and investigational products. These records are associated with documents so that you can easily find study-related documents in the Study eBinder.
Permissions
- Site Staff users without an add-on permission can only view the studies to which they are assigned as study team members.
- Site Administrator users can view and manage studies across the site.
- Research Organization Administrator users can view and manage studies across their research organization.
Study Lifecycle
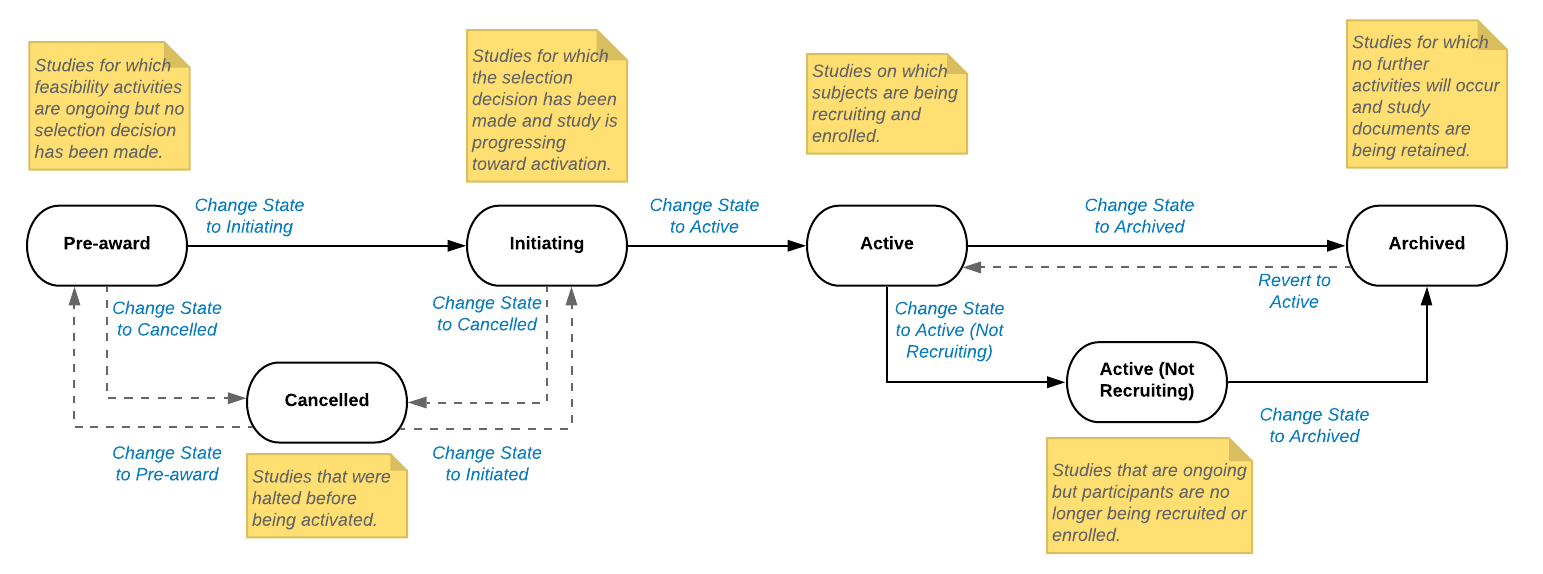
The study lifecycle is a sequence of states (such as Initiating, Active, etc.) that a study can progress through during its life. When you create a study, SiteVault automatically sets the status of the study to Pre-award. You can progress the study state to match your study activities.
The following figure defines and illustrates the sequence of states that are available for studies in SiteVault:
Create Staff Users
If you haven’t created user accounts for your staff, do this now to ensure they can immediately be assigned to the study team.
- Administrators
Overview
When you create a new SiteVault user for your site, you can choose from a set of system roles and, if needed, additional add-on permissions. See the About System Roles and Add-on Permissions page to learn more about what levels of access these roles and permissions provide.
For full access to the organization’s user administration, Research Organization Administrators (ROA) should also be added as Site Administrators at each site in their organization. ROA users can add users to one or more sites at a time when the research organization is selected in the vault selector. Site Administrators can only add users to their currently selected site.
For more access information, see About Roles and Permissions, or download the SiteVault Security Matrix or SiteVault User Access Guide.
Creating a Staff User
Complete the following steps to create a new Staff user or add an existing Vault Staff user to SiteVault:
- Access the Administration > Staff tab and select Create.
- Enter and re-enter the user’s email address, then select Check Email.
- If a user with that email address already exists in your research organization, enter an email address unique to your research organization.
- If one or more existing Vault user accounts are found, select the appropriate user account.
- If no Vault user accounts are found, continue creating the user.
- Complete the First Name and Last Name fields.
- Indicate if the user is an investigator.
- If applicable, complete any SiteVault Enterprise-specific fields:
- User Account Login Method: Select the appropriate login method.
- User Name: Enter a user name.
- Federated ID: Enter the user’s Federated User ID.
- Complete the Create as field:
- Select Staff with User Account if the individual is expected to access SiteVault.
- Select Staff (No SiteVault Access) if the individual is not expected to access SiteVault.
- Select Next.
- Optionally, select any additional sites, then select Next.
- For each site selected, select the user’s system role and any additional permissions (if selecting Site Staff). Use Apply to All Sites to apply the selected settings to all sites. To adjust, select a site and make changes.
- If the Create as field is populated with Staff (No SiteVault Access), then the role Site Staff (No SiteVault access) is selected for all sites.
- Select Save.
Create a Study
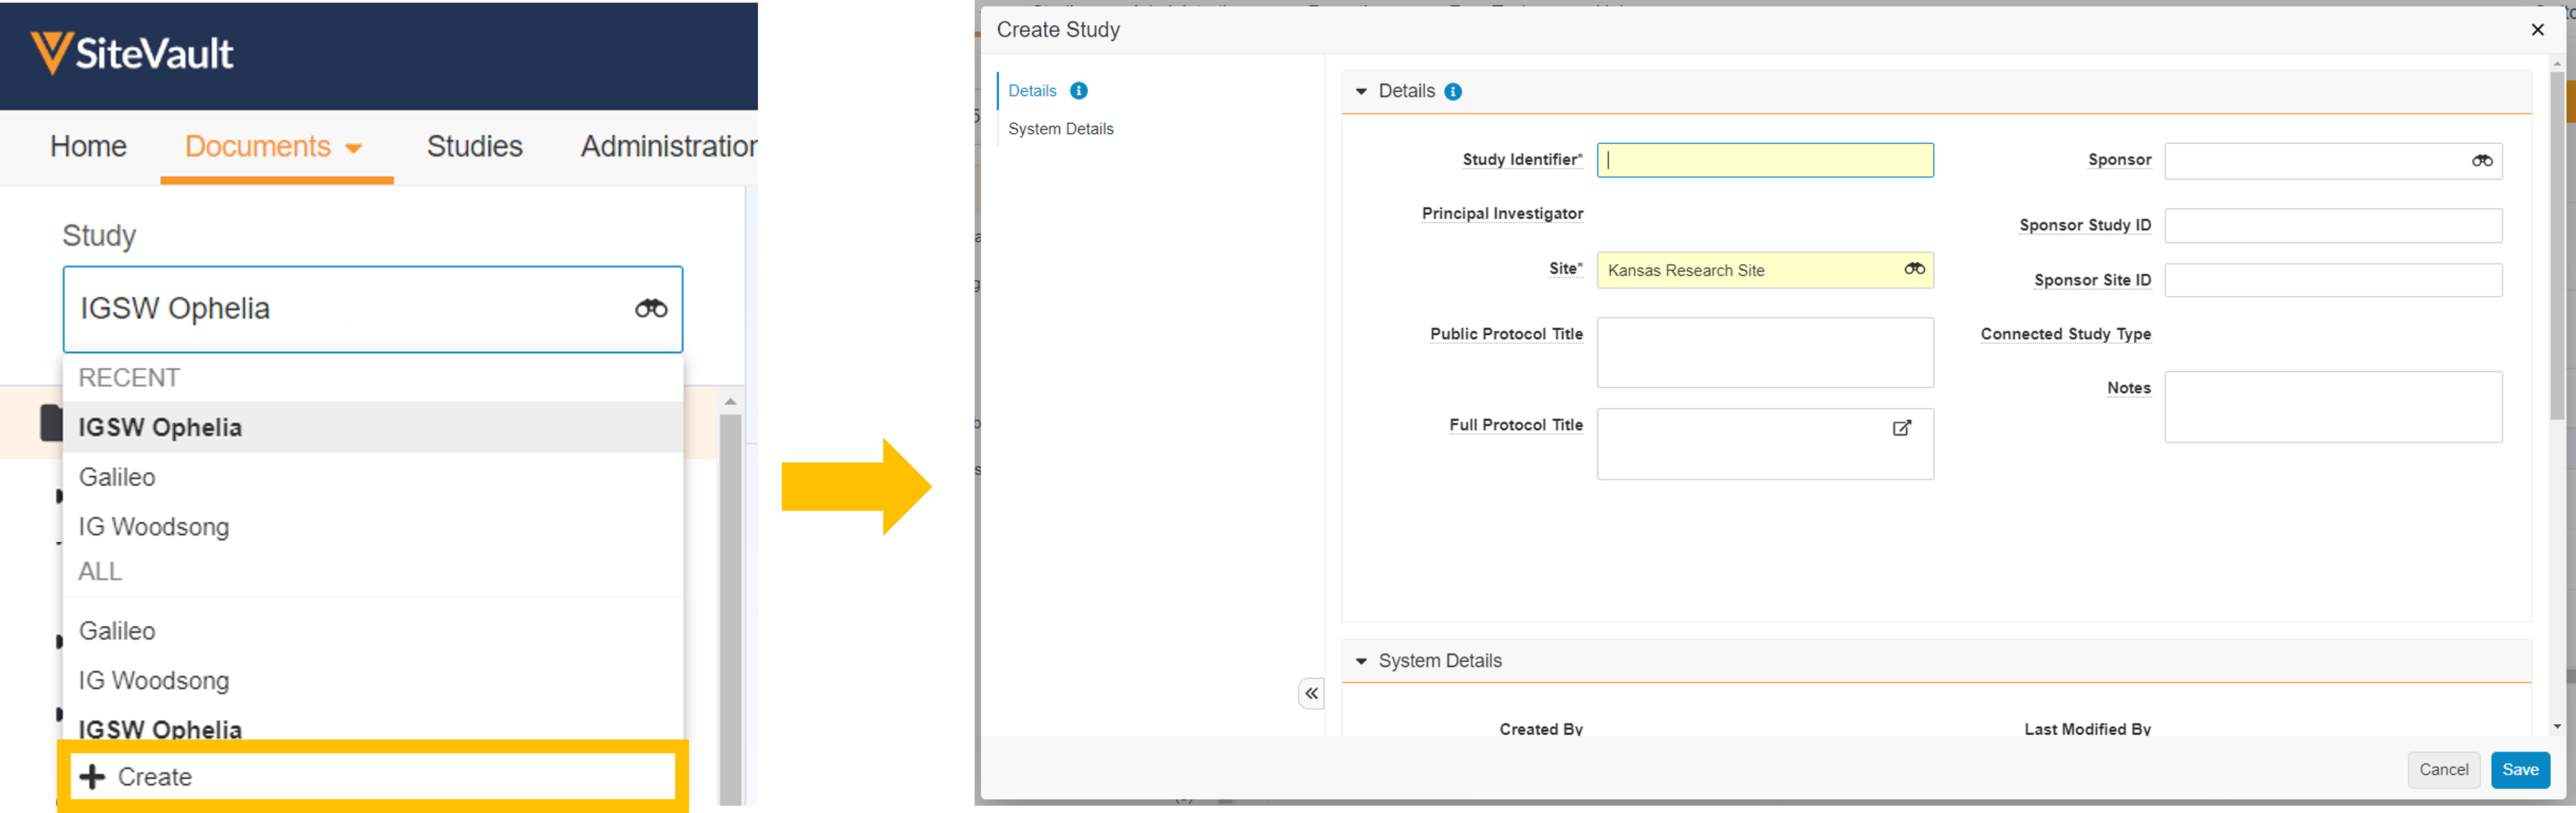
An administrator can create a study by following the steps below OR by using the +Create Quick Create tool in the Study eBinder Study Selector (see image below).
- Administrators
Follow the steps below to create a study. Once created, you can add products, team members, study organizations, products, and monitor or auditor assignments.
- Navigate to the Studies tab.
- Select + Create.
- Enter required and any additional information as needed.
- Select Save to complete the process.
Select View Study Details to reveal saved study information and study feature enablement.
Study Lifecycle
Studies are created in the Pre-award state. From the Pre-award state, you can progress the study to either the Initiating or Cancelled state. For more information on study lifecycle states, select the image below.
About Study Components
Studies include records of study components such as
- Study Team
- Participants
- Monitors and Auditors
- Organizations
- Products
To upload certain document types, document fields must be completed with study component information that already exists in SiteVault and is associated with the study. For example, to upload a CV, you must complete a field to associate the CV with an individual.
You may not have all of this information at the time of study creation, but we recommend creating the ones you can as early in the process as possible.
Administrators maintain lists of component records that are not study-specific (Administration tab); the components in these lists can be associated with one or more studies. Certain component records can be created during document upload by using the Quick Create tools. Simply select + Create in the component field dropdown menu.
Add Study Team
Assign site staff to the study team so they can access and work on the study.
IMPORTANT: If the study is utilizing SiteVault’s Digital Delegation tool, follow steps 1-4 as outlined in the Digital Delegation Process prior to adding site staff to the Study Team.
- Administrators
Review Roles and Permissions to understand all factors of SiteVault user access.
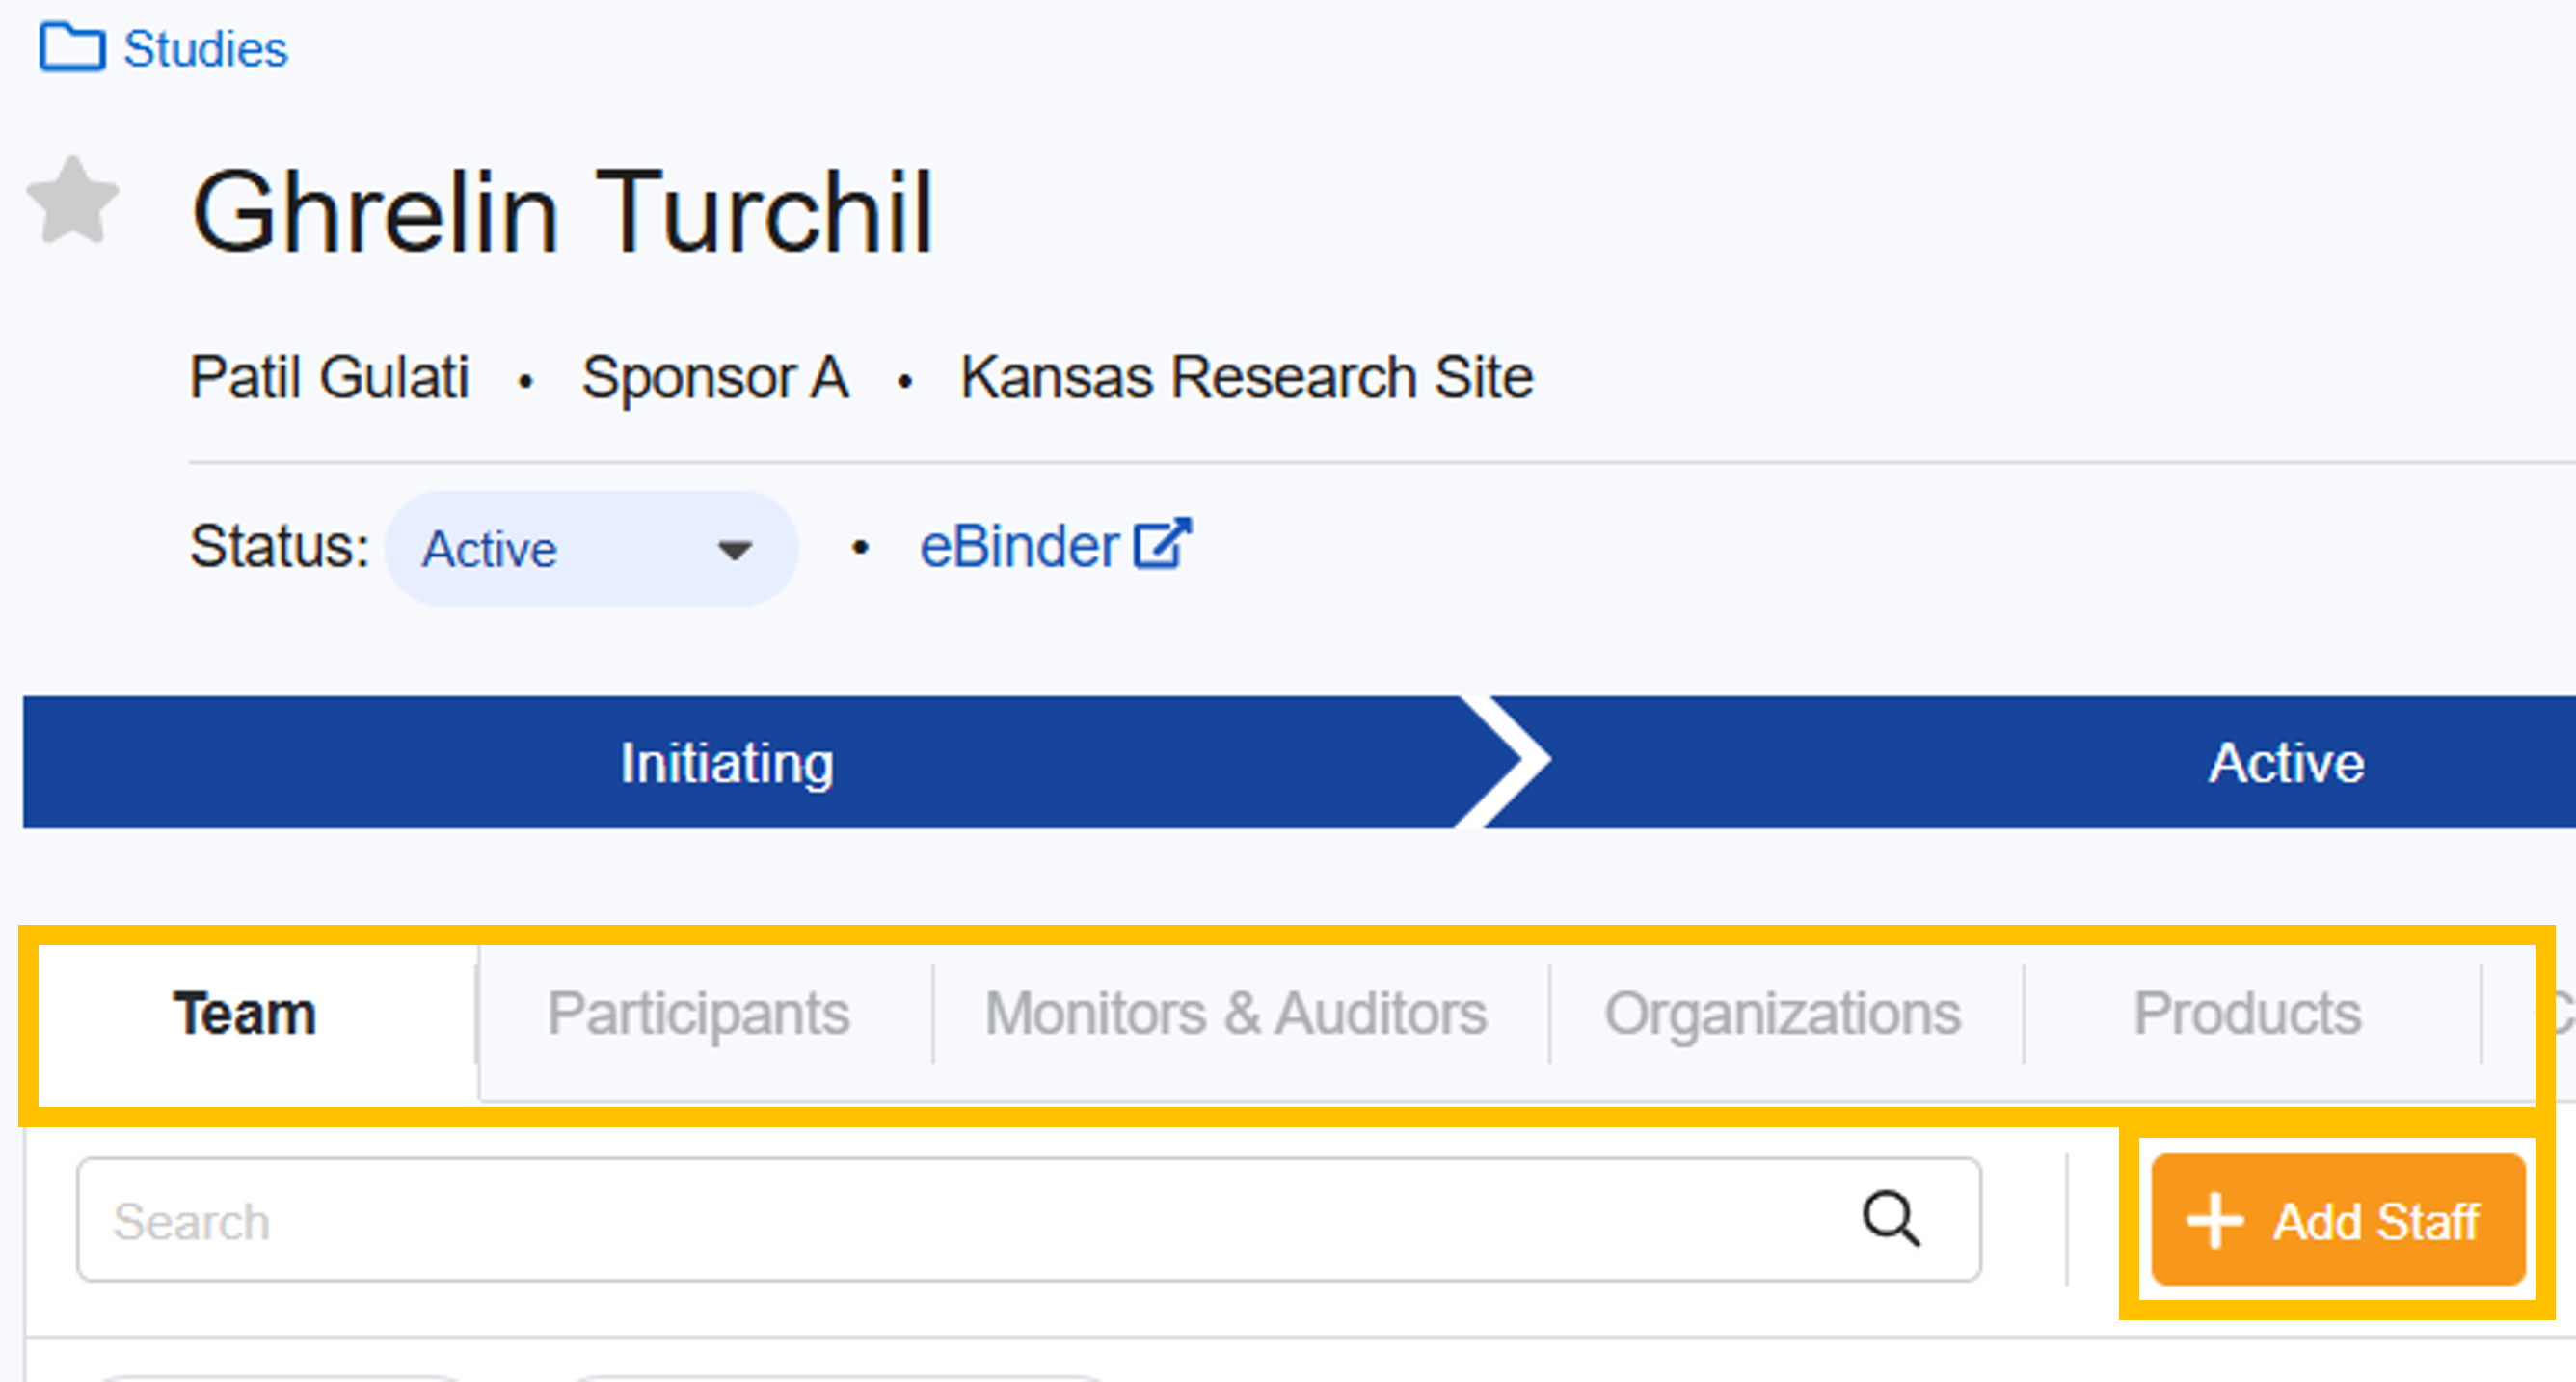
- Access the study from the Studies tab.
- From the Team tab, select + Add Staff.
- Select staff to assign or select a study from the Copy from Another Study field to use assignments from an existing study. Hover over staff names to reveal middle names (when available).
- Select or update the assignment role(s).
- Note: When a Study Team Assignment with the role of Principal Investigator is changed to Active, the Principal Investigator (PI) field on the study is automatically updated to that PI.
- Indicate if the user should have access to Restricted documents.
- In the Monitoring Issue Recipient field, indicate if the user should receive monitoring issues.
- Select Next.
- If available, complete the Start Date-Time field. If not completed, the field is automatically populated with the date the staff study assignment became Active in SiteVault.
- If applicable, complete the End Date-Time field. If not completed, the field is automatically populated with the date the staff study assignment became Inactive in SiteVault.
- Select Save to complete the process.
- If appropriate, change the assignment(s) to Active.
You can also create Study Team Assignments from Administrative > Staff.
Create Monitor or External Users
External users such as monitors, CRAs, or auditors may sometimes require access to your SiteVault. We have created specific permissions to easily grant them access but limit their view to the necessary study data. For more access information, see Monitors and External Users Access and Limitations.
To create a Monitor or External User account, they must be assigned to at least one study during the creation process. If the monitor or auditor for this study is already an active user with access to another study, you can simply add them to the study on the study’s Monitor and Auditor tab (see the next step in this guide).
- Administrators
Guidelines/Requirements
- Research Organization Administrator users can add users to one or more sites at a time when the research organization is selected in the vault selector.
- Site Administrators can only add users to their currently selected site.
- At the time of user creation or addition, a Monitor or External User must be assigned to at least one study.
- A notification is issued to the Monitor upon receiving access to a study.
- Scheduled Access Start Date must be a future date. If not completed, the Scheduled Start Date defaults to today and the user immediately has access to the study documents in SiteVault.
- Monitor access date/time is based on the site’s time zone.
For more access information, see About Roles and Permissions, or download the SiteVault Security Matrix or SiteVault User Access Guide.
Create a Monitor or External User
Complete the following steps to create a new Monitor or External User or add an existing Vault Monitor or External user to SiteVault:
- Access Administration > Monitors & External Users and select + Create.
- Enter the email address of the user to add, re-enter the email address, then select Check Email.
- OR enter a cross-domain user name in the email field; SiteVault will search for the user name and retrieve the matching email address.
- If a user with that email address already exists in your research organization, enter an email address unique to your research organization.
- If one or more existing Vault user accounts are found, select the appropriate user account. Contact your Research Organization’s administrator or the individual if unsure.
- If no Vault user accounts are found, then continue creating the user.
- Complete the First Name and Last Name fields.
- If applicable, complete any SiteVault Enterprise-specific fields:
- User Account Login Method: Select the appropriate login method.
- User Name: Enter a user name.
- Federated ID: Enter the user’s Federated User ID.
- Select Next.
- Select the + Add Study.
- Select one or more studies.
- Select Save.
- Optionally, complete the Scheduled Access Start and End Date fields.
- Indicate if the user should have access to Restricted documents.
- Select Save.
Add Monitors and Auditors
You can add monitors and auditors (with active user accounts) to the study by following the steps below.
If you already created new monitor and auditor accounts and assigned them to the study during that process, you can skip this step.
- Administrators
- Navigate to the Studies tab.
- Select the study.
- Select Monitors & Auditors.
- Select the + Add Monitor/Auditor button.
- Complete the User field.
- Complete the Study Role field.
- Indicate if the user should have access to Restricted documents.
- Complete the Scheduled Access Start field if access starts on a date other than today. If not completed, the field is automatically populated with the assignment creation date.
- If applicable, complete the Schedule Access End field. If not completed, the field is automatically populated with the date the Monitor & Auditor Assignment becomes Inactive in SiteVault.
- Select Save to complete the process.
You can also create Study Assignments from Administrative > Monitor & External User.
Add Study Organizations
- Administrators
Add an Organization to a Study
- Navigate to the Studies tab.
- Select the study.
- Select Organizations.
- Select + Add Study Organization.
- Complete the Role field.
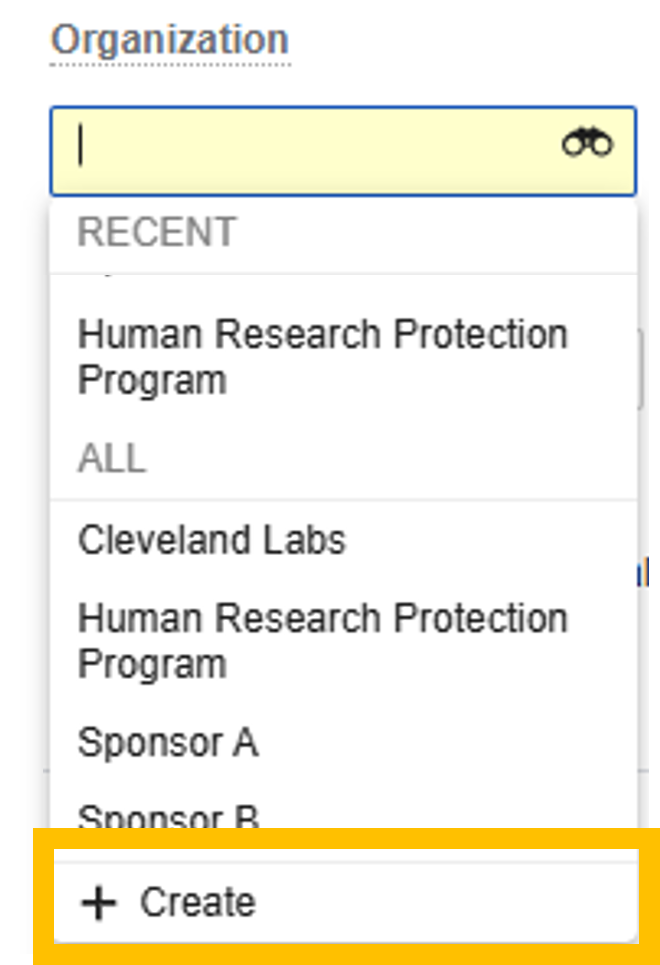
- Complete the Organization field.
- If the organization is not available in the list, select + Create Organization.
- Select the Organization type.
- Select Continue.
- Complete the Name field.
- Complete the Organization Sharing field:
- Selecting All (recommended) allows this Organization to be re-used across all sites and studies in your Research Organization (if applicable). Selecting Current limits use of this Organization to your currently selected site.
- Select Save to complete the process of creating the Organization.
- Select Save to complete the process of creating the Study Organization.
- From the Lifecycle State column, confirm or select the appropriate state.
Add Study Products
- Administrators
Add a Product to a Study
- Navigate to Studies.
- Select the study.
- Select Products.
- Select + Add Study Product.
- Complete the Product Role field.
- Complete the Product field.
- If the product is not available in the Product list, select + Create Product.
- Complete the Name field
- Complete the Product Sharing field
- Choosing All (recommended) allows this product to be re-used across all sites and studies within your Research Organization (if applicable). Choosing Current limits the use of this product to your currently selected site.
- Select Save to complete the process of creating the Product.
- Select Save to complete the process of creating the Study Product.
- From the Lifecycle State column, confirm or select the appropriate state.
Confirm Study Lifecycle State
When created, the study is initially in the Pre-award state. From this state, you can progress the study to either the Initiating or Cancelled states. The expected progression is Pre-award > Initiating > Active.
Review the image below for a description of each state and when each state is available.
Change Study Lifecycle State
To update the study state, complete the steps below.
- Navigate to Studies.
- Select the study.
- Use the Status button to select the appropriate lifecycle state.
Ready for Study Data
Your study is ready to go!
Your next activity is likely to be one of the following tasks: